|
July 30, 2005 - I got a late start today, not making
it to the shop till about 11AM. But once I got there I got right
to work. I started off by rolling the truck out into the
driveway and blowing off yesterday's sanding dust with
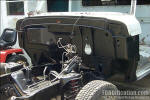
compressed air. I then wiped the firewall down one final time
before hitting it with the MetalReady (Fig. 4). I kept making
the rounds with the spray bottle, making sure it was kept
completely wet for at least 15 minutes per instructions...which
kept me busy, considering it was 85 degrees outside with a mild
breeze. The firewall then got rinsed off with a high-pressure
nozzle and blown dry with compressed air, making absolutely
certain to hit every nook and cranny where moisture might be
hiding. I then let the truck set for about an hour while tending
to other chores in the shop, just to make sure, but I did go
ahead and use the air nozzle again, just to eliminate the
possibility of moisture lurking anywhere. And then it was time
for the actual POR-15 application.
Because it was breezy outside, I really wanted to do the
painting inside the shop to slow down the drying process, but
there were just too many flies inside...and I didn't want the
little buggers landing on the tacky POR-15, so I went ahead and
did the application outside. It did dry a bit faster, but there
were far fewer bug tracks this time around. The application time
was about an hour, and by the time I finished up, the other side
was almost dry, but still a bit tacky....which is the perfect
time for applying the color coat, in this case Krylon Semi-Flat
black. I started on the left side, applying the Krylon over the
top of the POR-15, and by the time I'd made it to the right
side, the left side was ready for another coat. All together I
applied about 4 coats of Krylon, about 2 cans worth.
I
still had a little bit of POR-15 left in the Tupperware dish I
was using, so instead of wasting it, I went ahead and did a
quick cleanup of the inside of each door pillar, and then using
a sponge I reached inside and blotted POR-15 everywhere I could
reach, and after letting those areas set up a bit I used up
another can of Krylon in there. The coating inside the pillars
didn't turn out as smooth as the firewall, but once the doors
are mounted you'd have to specifically look inside them to see
it anyway....so I'm happy.
Well, now what? I mean, getting the firewall painted was really
the only thing on today's agenda, but I didn't have to be home
for several more hours to take over watching the boys while my
wife starts the graveyard shift at work, so I decided to take
advantage of the opportunity. The next step would be mounting
the radiator support, inner fenderwells and fenders. The fenders
will need some work prior to final attachment, but by mocking
everything up now, I could go ahead and get everything else
tightened down for the last time, including the cab. The inner
fenderwell brackets were already sandblasted and painted, but I
didn't have any bolts, so I spent the next hour or so cleaning
nuts and bolts with the wire wheel on the bench grinder, then
spraying them with a light coat of primer and then a couple thin
coats of Krylon. While they were drying I went ahead and dug out
the powdercoated radiator support and new bushings from LMC and
got the support loosely mounted. By this time the bolts were dry
enough to use, so I got the brackets mounted and then set the
inner fenderwells down in place and started a couple bolts, just
to hold them in place. |

Fig. 4 - After I used compressed air to clear any debris,
the firewall got coated with MetalReady.

Fig. 5 - TA-DA!! Damn that looks good! I was really
impressed with how the POR-15 laid down flat when applying it
with a foam brush.

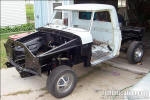
Fig. 6 - Next on the agenda was the mockup of the
radiator support and inner fenderwells. Here's the '79 F150
support loosely mounted.

Fig. 7 - This shot (and Fig. 7 below) show the inner
fenderwells setting in place. They're not bolted in yet, since I
ran out of time this evening before I could use the
freshly-painted bolts and nuts.

Fig. 8 - It's finally starting to actually look a truck
again, isn't it? Next on the agenda is to spend several hours
cleaning and painting bolts, nuts and washers to get everything
bolted together for the last time. |