|
Saturday, March 18, 2006 - Well, I
decided to hit the ground running today, and get started
stripping the front fenders down and getting them ready for
paint. Both front fenders were already completely sandblasted
and then coated with several layers of POR-15, and then several
coats of paint, so I just needed to do the front side of each.
On
much of my paint stripping I've been using a knotted-wire wheel
attachment for my 4-1/2" grinder, and started on the fenders
with this as well. However, it was just going very slowly, and I
really didn't want to spend all day on a couple fenders, so I
removed the wire wheel and attached the 3M composite stripping
wheel, and MAN, it made all the different in the world! I was
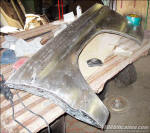
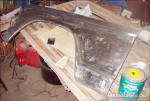
able to get each front fender completely down to bare metal in
only about an hour each. I then spent a little time with each
fender blocking it with fine sandpaper to get it as smooth as
possible, and to make it easier to find any imperfections (Figs.
1 & 2).
Each
fender has some small dings here and there, most are too small
to see with the naked eye but you can just barely feel them, and
since it's very possible this truck is going to be painted
black, I decided to spend the time to get these fenders perfect.
Anything not addressed now will definitely show up with black
paint. It seems that the bodywork 'expert's are split almost
50/50 on whether filler should be applied directly to bare metal
or to primer, and since I already had the fenders stripped, I
just decided to go ahead and do all the necessary bodywork now.
Most
of the small dents were easily tapped out from the back side to
about 99% straight...a very thin coat of filler will be all
that's required. The lower/rear section of the driver's fender
was just a little wavy, right where the brace is attached on the
back side. Because I couldn't get access to these to tap out,
I'll just be using filler to smooth it out. Fortunately the
worst section is still only about 1/8" deep, so it's still well
within reason. Most of the areas on the fender with filler was
sanded down to paper-thin thickness.
The first trip through the sanding
process was a learning experience. I tried using a hard rubber
sanding block at first but found that it was still too flexible
and it tended to try to conform to the dent and I sanded off TOO
much, so I ended up going back over some of these with another
thin layer of filler.
In between applications (while it was drying) I was getting
started stripping down the rest of the '68 parts truck. When I
first put the truck in the shop several weeks ago I tried
removing one of the top header bolts, and could see the head of
the bolt start to turn but the other end wasn't. It's been in
the shop for a couple weeks now, and I've been religiously
spraying the header bolts with PB Blaster and letting it do it's
job, so I wouldn't break any off during removal. Today I tried
removing them...with great results. Most came right out with a
wrench. (That PB Blaster comes through again....man, that's some
good stuff!) I got them all out except one, but only because I
couldn't get to it! I'm going to have to just leave that header
on when I remove the engine and then try to remove that last
bolt.
Anyway, I got sidetracked with the parts truck and didn't get
around to sanding off the final layer of filler on the fenders,
so that'll have to wait until next time. But I only have maybe
another 30 minutes worth of sanding before they're ready for
paint. I
decided to spend my shop day next weekend getting the '68 parts
truck completely stripped and out of the shop, just so I'll have
some room to work in there. Besides the 390/T-18, about the only
other thing worth salvaging is the factory rear overload spring
setup. Stay tuned! |

Fig. 1 - A shot of
the passenger fender stripped and blocked.

Fig. 2 - Same
fender, different view.

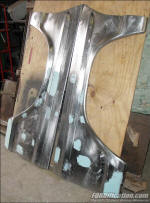
Fig. 3 - Both
fenders are stripped, blocked and have filler applied. This was
taken just before sanding.

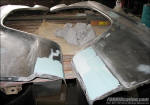
Fig. 4 - This shot
was taken after sanding off the first layer of filler. I'd
applied the second layer (due to my getting a little
over-zealous with the sanding block) and was waiting for it to
cure before sanding. I'd estimate that 98%-99% of the filler
will be sanded off.

Fig. 5 - Here's a
view of the already-finished back side of one of the fenders. |