|
August 18, 2012 - Well, I
didn't get my wish...I was hoping to get the second coat of
primer sprayed today, but the weather forecasters were
correct in their rain prediction. It started raining about
8AM this morning, and rained non-stop for around 4-1/2
hours. Therefore, there won't be any priming done today...or
tomorrow either, for that matter. Since primer tends to
absorb moisture, I need to give the truck a minimum of one
full day to dry out before thinking about doing any sanding
or spraying. So since I'd allocated
today as a day of working on my truck, but I can't, I
thought I'd head everyone off at the pass so-to-speak, and
spend the day putting this page together, to give you some
information about the paint and primer I'm using and the
equipment I'm spraying it with.
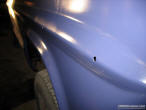
Fig. 01 - This shows my
bumpside fender with two coats of Rustoleum
rolled on. The orange-peel is evident, but would
have disappeared with a little wet-sanding. |
The Paint
By now I don't think there's
anyone online who hasn't heard of the infamous "$50 Paint
Job", a
moparts.org forum thread that has spread to virtually
every automotive-related forum online. (Do a Google search
for '$50 paint job' and you'll have enough reading to keep
you busy for weeks.) This thread describes how to use
readily-available Rustoleum paint and high-density foam
rollers to give a very nice paint job for very little
monetary investment. It's become a low-cost alternative for
folks who don't mind investing a little more time than
money, since a great deal of color sanding is required, or
who don't have the means or desire to invest in all the
equipment necessary to do a proper basecoat/clearcoat or
single-state urethane paint job. And while it's not a method
that should be used to paint a collectible car, it's
definitely something worth considering for a work or school
car, where a show-quality paint job isn't necessary or even
an option.
Back when I was working on
my truck in the shop, before I lost the shop, I'd read this
moparts thread, as well as many others on other automotive
forums, where people were using this method with pretty good
results. Although my shop did have a large single-stage air
compressor, it still didn't have the air output recommended
for an HVLP (high-volume low-pressure) paint gun. I could
probably have made it work, by not trying to paint the
entire truck in one setting...by painting a panel or two per
day...but I was still very intrigued by this Rustoleum
method, so I decided to give it a try on one fender of my
truck, just to see how it looked. I bought all the supplies
(primer, paint, sandpaper, etc.) and got started. I was
actually impressed with what I'd seen so far, though I only
made it halfway through the process on this one fender
before having to stop and move out of my shop and the truck
into storage.
Anyway, at the time, I'd
wanted to go with a very deep dark blue, but the color that
got mixed for me ended up being more of a purple-ish
blue...not at all what I had in mind. I told myself that
once I got back to work painting the truck, I'd get another
batch of Rustoleum mixed up in the proper dark blue.
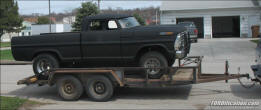
Fig. 02 - My flat-black
choptop truck inspired me to go a step further
than a basic flat-black truck. I kept picturing
this truck low to the ground, with tinted
windows and custom rims....and a paint job
slightly different from the everyday flat black
that's been overused. |
But in the years since I
last worked on the truck, and especially in the past few
months since getting back to work on my truck, I'd been
starting to lean very heavily in another direction, another
'cheapo paint job' alternative. I really liked the look of
my flat-black choptop truck and wanted to do something
similar...and one of the more-popular flat-black
alternatives is an implement paint by John Deere, called
Blitz Black. This particular paint isn't flat, nor is it
semi-flat...it's sort of in the middle. It's more of a
satin/suede paint, manufactured for John Deere by Valspar,
and has a sheen to it a lot like what a new barbeque grill
might have. I like to think of it as 'flat black...with a
little attitude'.
If you do a Google search for Blitz Black,
you'll have plenty to read about it (both pro and con) on
various websites. However, among the hotrod crowd it's
gotten very popular, due to it's ease of application and the
overall sheen that's left after it dries. And it's
what I've decided to do with my truck. Here are a couple
pictures I found online of vehicles painted with Blitz
Black, just to give you an idea of what it looks like. Fig.
03 even shows a bumpside truck with this paint:
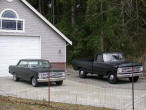
Fig. 03 |
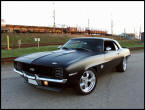
Fig. 04 |
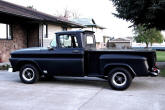
Fig. 05 |
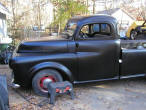
Fig. 06 |
Here are a links to read more about Blitz
Black:
So how am I going to apply the paint and
primer? Read on...

The Paint Gun
As mentioned earlier, I'm
building this truck outside in my driveway, out in front of
my little one-car garage. There is no 220V hookup in there
for an air compressor, so I was looking at either rolling
this stuff on with foam rollers (like the Rustoleum), or
trying to scrape together enough funds for a cheap 110V air
compressor and cheap HVLP gun from Harbor Freight, and just
spraying it on in small batches. However, I found an
alternative.
While doing some research
one night, I was reading on a VW forum [link]
about turbine HVLP spray guns. These setups don't need an
air compressor, since it just basically blows the air at
high speed, using the same motor as a vacuum cleaner, and
there is no need for oil or water filters, since there's no
oil in the turbine and no air is being compressed to
generate the moisture. You don't have to wait for a
compressor to 'catch up'...therefore they'll spray all day
long. These spray gun setups will handle automotive paints
just fine, according to those who have used them (though I
haven't yet read about anyone who has tried spraying
metallics through one). Now, just like any equipment, you
can get high-end versions of a turbine HVLP sprayer like
those offered by
TurbineProducts.com or the less expensive models like
several offered at Harbor Freight.
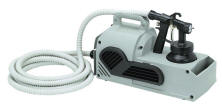
Here's the one I bought from Harbor
Freight and am using:
High Volume, Low Pressure
Spray Gun Kit
(link to Harbor Freight
listing)
Chicago Electric Power Tools
Item #44677
$129.99 |
 |
Since this
HVLP gun might no longer be available from
Harbor Freight a few years in the future, and I
wanted to properly document what I'm using, I
did a screen-capture of the page where it's
listed on the HF website. If the direct link at
left becomes inactive or you get a page error,
CLICK HERE to view this screenshot. |
At first I tried the Buff Primer
recommended for the Blitz Black by John Deere, thinning it
with the JD thinner according to the instructions on the
primer can, and spraying onto a dented hood I got from a
local body shop. I was not at all impressed with the huge
amount of orange peel I got. Tried different settings on the
gun, but no improvements. Then I decided to try thinning it
out a bit more, and the orange peel problem was
significantly reduced, though still a bit more than I was
happy with. I should have tried thinning it a bit more, per
what I've been reading on the various forums, where they
recommend thinning the paint 10%-20% more than what's called
for on the can. If I had, I'd probably have been happier.
However, I then decided to try spraying
the Rustoleum primer I had, and was much happier with the
results, though there was still a small amount of orange
peel evident. Again, in retrospect, I really should have
tried thinning it out a bit more than called for on the can
for better results.
Anyway, I used two quarts
of Rustoleum primer on the cab and front sheetmetal and it
laid down very smooth, with hardly any orange peel at all.
Once it dries, and I'm able to add a second coat, I think
it'll sand down extremely smooth. However, when I mixed up
the Rustoleum primer to paint the box, I suddenly started
have spattering problems and much more orange peel. After
spraying about half the box, I stopped and went in and added
a little more mineral spirits to the mix, and the rest
sprayed out great...so it WAS simply a matter of not having
it thinned enough. When I go to spray the second coat of
primer on, I will definitely thin it out more, at least 10%
more than called for on the can (which is only 1 or 2 parts
to 10 parts primer). I also want to try a smaller tip. The
1.8 tip was installed when I got the gun and seeing as how
that's what's normally recommended, I left it in. However,
those on the forums who use their turbine sprayers suggest
using a smaller tip. So within the next week or so, when I
get ready to spray the second coat, I'll be doing some more
experimenting beforehand, trying a smaller tip and thinning
it out a bit more and will report back how it's working.
I think overall I'm going
to be very happy with this, especially considering the
minimal investment. There's just the learning curve where I
need to figure out the optimal settings, mixtures, etc. to
get the best results with the products I'm using. Once I get
it figured out, I just might have to write up a tutorial for
the tech section, describing what I found out and give some
overall impressions.
Stay tuned! |