|
Saturday, January 28, 2006 - Well, after
several weeks of not being able to get in any shop time, I
finally had another day today to get some more work done. I
didn't know exactly what I was going to do...but I figured I'd
get back to work on the '67 box, getting it stripped
down...which is what I spent the whole day on.
I've
been having a lot of second-thoughts and doubts over the past
few weeks about this portion of the project, not really sure if
I wanted to put myself through all the work that repairing this
box would require. Several times I've told myself to just scrap
everything and keep my eyes open for a good box to use instead,
but I finally decided that I'd do both. That is, I'd continue
with the bed repair as planned, but still continue to search for
another box. However, I'm being realistic enough to know that
the chances of my finding a replacement that's in my budget and
in my immediate vicinity are next to none, so I'm not going to
hold my breath.
So....I got started. While I was originally intending to just
replace the bed sides, using the LWB '68 F100 as a donor, I
decided that the interior box sides also needed replacement. The
back sides of these panels were very pitted, and were rusted
through in places. After some thought, I decided to take them
out in one fell swoop. I started off by using an air chisel to
break the spot welds holding the bedside to the end cap and the
bed front, and then continued all the way down the length of the
bed, using the air chisel to break the spot welds holding the
lower bed side to the inner bed wall. Once the lower bed side
was removed, I then completely cut out the inner bed wall and
fenderwell (Fig. 2). Once those were removed, I then removed the
wheelwell from the bed wall and discarded the wall....the
fenderwells will be repaired and reused. You can see in Fig. 2
you can see the fenderwell still connected to the bed
wall...they were separated right after taking that picture.
At
this point I decided to go ahead and drill out the 16-18
spotwelds on each side of the bed front, which connects it to
the sides and separate them completely. Not only will it make
the repairs a little easier in the long run, since I can lay the
pieces down flat for welding and repairs, but I'll be able to
carry each bed side and the front panel into my sandblast booth
beforehand to get them each 100% cleaned up.
In
Fig. 5 you can see the extent of the rust damage on the back
sides of the inner bed wall. I've been trying to figure out what
to do about this...whether I should just cut it out or not...and
I'm glad I chose that route. This will actually be the easiest
part of this job, since it's just flat steel. When cutting it
out I left about a half-inch lip around the perimeter to weld
the patch panel to. I have some 1/4" diamond-plate steel
(straight steel, not stainless) that I'm seriously thinking
about using for this, since not only will it add a lot of
rigidity to the bed sides, but it'll add a little pizzaz too! I
will probably also use the diamond plate to replace the four
flat sections of steel in each of the bed corners.
The
right-side fenderwell is in pretty good shape and will need
nothing more than to be cleaned up and reattached. However, the
left fenderwell has some major cancer right along where it
attaches to the bed floor (Fig. 6). Fortunately this area is
also flat steel, so it'll be a fairly simple task to cut this
area out and weld in a patch panel.
At
this point, with the '67 bed completely disassembled (well, as
far as needed, anyway), I decided to get the '72 bed floor
removed from the chassis, since it was still bolted down. This
will probably be the first major bed component that'll see some
time in the sandblast booth. Considering how rusty the whole
underside of the truck was, it's amazing that the bed floor has
no major rust, just a lot of surface rust that'll clean right up
(Fig. 7). The one piece with cancer in it is the front floor
support (Fig. 8), which will be removed by drilling out all the
spotwelds and replacing it with a floor support from the '67
bed.
So
that's basically where I'm at at the moment. I was hoping to get
started cutting the donor side panels from the '68 parts truck
today, before it was raining pretty good all day long, so that
will have to wait for another day. I'd imagine I'm going to be
looking at at least another day's worth of work carefully
removing those anyway.
So...right now I've got four major bed components...the bed
floor from the '72, the two bed sides from the '67, and the '67s
front panel. I will be spending some time getting as much paint
removed and rust cleaned up with a wire wheel before taking them
into the sandblast booth, since I've found that doing so really
speeds up the sandblasting. Once everything is completely
sandblasted clean, then I'll get started on the reassembly.
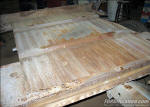
Fig. 7 - Here's a view of the bed floor after
disconnecting it from the chassis and flipping it over. Other
than the cancer in the front support, it's in pretty good
condition. |

Fig. 8 - The front floor support on the '72 bed is the
one thing needing repair. The '67 support is perfect so it'll be
used here. |
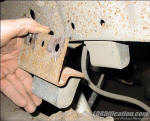
Fig. 9 - This is completely unrelated...but here's a comparison
of the bumper mounted above the rearend. I'm holding a '67
assembly which uses a mounting bracket that the '72 doesn't
have. |
|
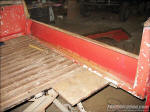
Fig. 1 - Here's the driver's-side bedside and inner bed wall
removed. You can see the removed bedside on the floor.

Fig. 2 - Here's another view. You can see the inner bed
wall and wheelwell was cut out and set aside. I left about 1/2"
of edge to allow myself something to weld the replacement metal
to.
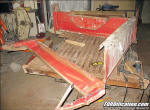
Fig. 3 Here's a view of the left-side separated from the
front panel.
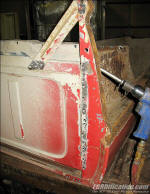
Fig. 4 - Getting started on separating the bed front from
the right side, by drilling out the spotwelds.

Fig. 5 - The rust on the back side of the inner bed wall
is obvious in this photo. The metal is very thin in spots and
completely rusted through in a few others.

Fig. 6 - The rusty left inner fenderwell
|