FORDification.com
   (powered by Google)


  HOME

  Technical Articles

  Factory Literature

  Discussion Forums

  Photo Galleries


  Service Bulletins (TSBs)

  Decoding Your VIN

  Diagrams & Schematics

  Links & Resources

  In the Movies

  Downloads
  Member Meet & Greets

  In the Media

  Site Index

 MISC / PERSONAL

  My Truck Projects

  My Heinz 57 '67

  I've Been Censored!

  Contact


You are here: Home My Truck Projects The '67 Page 34
Back to My '67 Project Index
Bending the Brake Lines

Sunday, Sept. 26, 2004  -  Well, I spent the whole day at the shop today working on brake lines. Even though there are certain aftermarket companies like Inline Tube who have pre-bent lines in both steel and stainless steel, I decided I wanted to try my hand at doing my own. Though the aftermarket vendor's prices weren't necessarily a deterrent, it did help seal the deal. Pre-bent steel lines are about $155, whereas I was able to get all the steel lines, unions and connectors for under $30 at the local auto supply store. And while the final result isn't concourse-worthy, I felt it was pretty darned good for a driver, especially since it was my first time.

All steel lines were to be replaced, with the exception of the the lines between the master cylinder and proportioning valve, since they were still in great shape. However, I did end up using another chunk of used line, because it was still in great shape...and this is the piece exiting the proportioning valve and heading back to the rear brakes. When I removed the proportioning valve from the parts donor truck, I reached back from inside the engine compartment and snipped the brake line back as far as I could reach, mainly intending to just use it as a template for bending a replacement. However, since it was in such great shape and already bent perfectly, I decided to use it and to just flare the end of it and attach it to the rear brake circuits with a line union.

So anyway...I started off bending the lines which run across the differential, then ran the line up the left frame rail to the proportioning valve. The prop valve wasn't cleaned up yet, but I went ahead and mounted it to the top of the steering box so I could use it for bending the lines. However, I noticed that I also hadn't gotten around to sandblasting or mounting the front brake-line brackets, as well as a few other small brake-related items, so I decided I just needed to fire up the sandblaster to get these all done. Once sandblasted and painted, the brackets got mounted onto the frame on each side with new holes drilled into the frame. After drilling the holes on the driver's side, I was able to access the inside of the frame (behind the steering box) through a hole (Fig. 4) using an offset distributor wrench. I hope I never have to remove these brackets again, as the nuts behind the steering box are extremely hard to get to!

The only portion remaining is the section from the propportioning valve to the right-front corner. I ran out of steel line before doing this corner, so it'll have to wait until next weekend.


Fig. 1  -  My first custom brake line...not too bad.


Fig. 2
- Again, it's not bad. Not perfect, but it'll get the job done. I might redo this section later on, just for appearance sake, but I might not. We'll see.
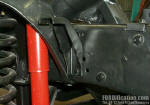

Fig. 3
- Here's the newly-mounted disc brake line brackets. You can also see the bracket in the upper right-hand corner on the top of the frame, which is used to help secure the rear brake line as it exits the proportioning valve.
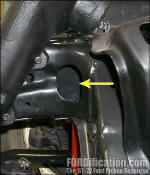

Fig. 4
- I was able to tighten the bracket bolts with a distributor wrench through this hole.

Fig. 5 - I was able to salvage the brake line armor from the truck's old lines. After getting cleaned up, they were slid onto the lines prior to flaring the ends. Here's a shot of the semi-finished product on the left-front corner. (The armor also has the added benefit of hiding minor bending flaws from novices like myself.) While it might never impress the judges at a car show, I think it looks pretty good. Once I connect the flexible line to the caliper, this section will be done.


Fig. 6 - Here's another view of the finished left-front corner. There is one brake line union hidden behind the crossmember, which connects the line exiting the prop valve with the rear brake circuit.

How to Double-flare Brake Lines
FIG. F1 - Here's what the steel line looks like immediately after cutting it with a tubing cutter. The steel wheel of the cutter slightly deforms the end of the tubing by adding a ridge to the inside.. You'll have to use a reamer to remove the ridge from the end of the tube. The end of the tube has to remain completely square and flat, so be careful here.
FIG. F2 - After reaming the end of the tube, you'll need to use a small hand file to put a chamfer on the end. This is a mandatory step for creating the double-flare. This is your last chance to make sure the tube's end is completely de-burred. This is also your last chance to slide the connector onto the tube. Do it now!
FIG. F3 - Insert the end of the tube into the clamp, using the double-flare insert as a guide. The top of the tube needs to be the height of the insert's step. Then tighten up the clamp, starting with the end closest to the tube. Then tighten the other end, which will use leverage to securely hold the tube.
FIG. F4 - Put the insert into the end of the tube and slide the flaring tool over and snug it up to the insert, making absolutely sure that the insert is square to the clamp.
FIG. F5 - When you remove the flaring tool and insert you can see the bell shape formed by the insert. Put a very small drop of oil or other lubricant onto the end of the tube (to keep the tool from galling the tube),  then slide the flaring tool over onto the end and tighten down, to form the second part of the flare....
FIG. F6 - ...and voila'! If you did everything right, this is what you should end up with and the whole process only took about 2 minutes.
 

first  previous

next   last


Home  |  Back to My '67 Project Index  |

You are here: Home My Truck Projects The '67 Page 34


Want to link to this site? Please save this banner to your hard drive to place on your webpage.
The correct link to use is http://www.fordification.com


Copyright library© 1999-2019 FORDification.com unless otherwise noted. All rights reserved.
All brand names and product names used on this website are trade names, service marks or registered trademarks of their respective holders.  
No portion or content of this site may be reproduced or otherwise used without explicit permission.
To report problems or provide comments or suggestions, please click here.