|
Jan.
03, 2004 - I spent the whole day in the shop on New Year's Day
getting some more sandblasting done to the cab...and I'm making good
progress, thought this is a very time-consuming task. However, I think
another full day will pretty much finish it up...I hope!
Yesterday I
took a drive up to a nearby big-truck salvage operation, in hopes of
bringing home another F-600 panel for my truck. I was thinking I needed
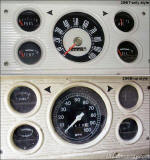
a matching tachometer and vacuum gauge. However, my panel is a '67-only
style and there was only one other like it there, which didn't have the
tach or vacuum gauge. There were a half-dozen of the '68-up styles, and
a couple had either a vacuum gauge or a tach, but none had both...plus
they were a different style that wouldn't match up with mine, so I
didn't pick one up. The F-600 tachs are mechanical-drive anyway, and the
distributors will not easily fit my engine, so I'd be forced to go to an
expensive tach-drive racing distributor in order to use the tach. I
decided to just keep my eyes open for something else to use instead.
On the way
back home, I stopped and talked to an old couple with a beat-up '72
F-100 Explorer parked out back behind their house. I'd talked to them
once in the past when searching for a cab, but found this cab wasn't
good, so I passed on purchasing it. However, I thought I remembered it
having PS, PB and A/C, so I thought maybe I could pick it up really
cheap for the parts, and stopped in again to look it over. However, not
only did it not have PB or A/C, but the old fart wanted $200 for it, and
I didn't see enough useable parts left on it to warrant paying that...so
I passed on it again.
Almost
home...but one more stop to make. I'd spied a farmhouse a few weeks
earlier with dozens of old cars and trucks parked around it, but
couldn't stop to take a look. This time I did. Turns out I knew the guy,
but the only Ford pickup he had was a mid-70s 3/4-ton with a slide-in
camper on it. He said he was going to pull the engine and tranny and
junk the rest, so I told him to give me a call when he was done with it,
so I could pull the power disc brakes setup off it.
Got up this
morning and decided to hit the shop again to try to finish up on the
sandblasting. However, by the time I'd emptied the first tank-full of
sand, I decided it was too cold, so I shut down the operation. Not
wanting to waste a day in the shop, I decided to start preparing the
hood. I got my hands on an old Torino shaker hood scoop assembly years
ago, and since starting this pickup project, I thought it would be fun
to use it. However, the pickup's engine is offset to the passenger side
by several inches, plus it sets too low in the engine bay to
work...which meant I had to come up with another idea.
At first I
was just planning on cutting a hole in the hood and attaching the
top-plate assembly to the underside of it. But after doing some
measuring, I found that wouldn't work, as the scoop would sit too high
out of the hole. After doing some more careful measuring, I found that
if I were to just cut the hole in the outer sheetmetal but leave the
bottom side bracing, the upper scoop assembly would sit on top of the
underhood bracing and protrude out the hole and look correct. This had
the added bonus of enabling me to attach it solid in an almost invisible
manner.
|

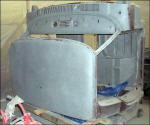
This shot
shows how much more progress I got done on sandblasting the cab on New
Year's Day.

Here's a
comparison of the center portions of the '67 vs. the '68-up F-600 dash
panels. While the panels themselves are identical, note the differences
in the gauge lettering.

Here's the top portion of the Shaker scoop
assembly, after removing it from the baseplate.

To mount the
Shaker scoop, I first cut through the top layer of the hood's
sheetmetal. The top section of the scoop will rest down on the hood's
bracing.
|