|


|

 |
|
|
Some of the more
commonly-asked discussions on the Ford truck forums and
groups revolves around the brake setups...specifically,
proportioning valves...as well as several other
brake-related components that are consistently misidentified
as proportioning valves. Knowing what each of these
different components actually are and how they function is
the key to understanding how your truck's brake system works
and how to properly troubleshoot it when problems arise, so
let's discuss these in detail...
First of all, let's
start out with a few facts:
1) All Ford F100s up through 1972 only
had drum brakes front and rear. However, disc brakes
were an available option on F250/350 starting in 1968.
They became standard equipment on F100s in '73.
2) Vehicles with 4-wheel drum brakes don't need a proportioning
valve, while vehicles with disc brakes and rear drums DO need a proportioning
valve! (More on this later.)
3) Ford did not start installing a disc-brake
proportioning valve in their trucks until 1973. Even the
'68-'72 F250/350
with front disc brakes didn't have a proportioning
valve. Their brake 'add-ons' include only a brake
pressure differential valve and a stand-alone metering valve.
|
|
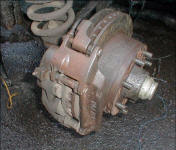
Starting in 1968,
Dayton dual-piston caliper disc brakes were an available
option on F250/350 models only (shown at right). This was a new
technology for Ford and they were still trying to fine-tune
them and match them to the completely-different operating
characteristics of the rear drum brakes.
Therefore, the
brake proportioning valve as we know it today hadn't even
come onto the Ford truck scene yet. The brake line circuits
only contained two 'add-on' components: the brake
pressure differential valve and a
stand-alone metering valve. Both of these
two components are often improperly
misidentified as a proportioning valve....and
that misidentification tends to cause a lot of
problems. |
CLICK TO ENLARGE |
|
So let's examine
these two components and discuss what they
actually are. |
|

| Brake Pressure
Differential Valve |
| |
|
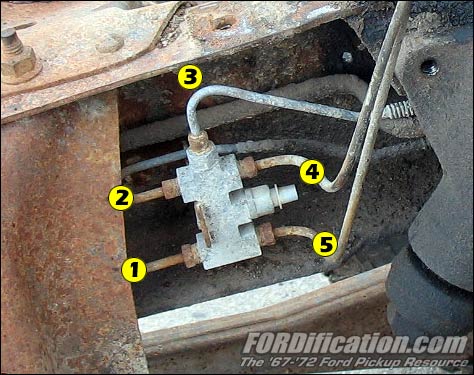 The little device mounted
inside the left framerail, just below the driver's seat area, is
a BRAKE PRESSURE DIFFERENTIAL VALVE. It is NOT
a proportioning valve, nor is it a 'distribution block'! It's important to understand
this...and what's it's actual function is. It has no
proportioning features to it whatsoever and doesn't affect
brake performance in any way. The stand-alone brake pressure
differential valve is used on all '67-'72 trucks, 2WD and
4WD, regardless of whether the truck is equipped with front
disc or front drum brakes. The little device mounted
inside the left framerail, just below the driver's seat area, is
a BRAKE PRESSURE DIFFERENTIAL VALVE. It is NOT
a proportioning valve, nor is it a 'distribution block'! It's important to understand
this...and what's it's actual function is. It has no
proportioning features to it whatsoever and doesn't affect
brake performance in any way. The stand-alone brake pressure
differential valve is used on all '67-'72 trucks, 2WD and
4WD, regardless of whether the truck is equipped with front
disc or front drum brakes.
1 - Rear
2 - Left-front
3 - Right-front
4 & 5 - Master cylinder |
|

CLICK TO ENLARGE
This diagram from the Ford
Truck Shop Manual isn't 100% accurate, as the factory piece
actually used has 5 ports (plus the switch port) as opposed
to the 4-port Mustang version showed here. However, the
principle is the same. |
Unlike a metering valve or
a proportioning valve, a pressure differential valve doesn't
have any preset pressure settings to delay or to reduce the
hydraulic pressure being applied. It's just a spool
suspended and balanced inside the valve body between equal
pressures of the front and rear brake circuits. If the pressure in either circuit is unequal, the spool is pushed
to the low pressure side, closing the switch contacts and
illuminating the dash-mounted warning light...simple. It
doesn't have any metering function for the front brake
circuit and no proportioning function to the rear brake
circuit like the all-in-one brake assemblies (see
'Combination Valve' below) installed during the '73-'79
trucks.
|
CLICK TO ENLARGE |
|
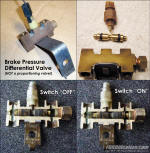
Once
the problem that caused the warning light to illuminate has been corrected, the piston must be
re-centered to turn off the warning light.
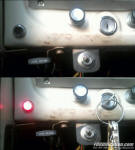 The warning light mounted
on the lower-left of the dash, just above the parking brake
assembly, is often mistakenly associated with the parking brake,
due to it's proximity. However, as mentioned above,
the dash-mounted brake warning light is only hooked up to
the brake pressure differential valve and is NOT connected
to or associated with the parking brake in any way! The warning light mounted
on the lower-left of the dash, just above the parking brake
assembly, is often mistakenly associated with the parking brake,
due to it's proximity. However, as mentioned above,
the dash-mounted brake warning light is only hooked up to
the brake pressure differential valve and is NOT connected
to or associated with the parking brake in any way! On '68-'72 models, if the
system is working properly as designed, the warning light
will come on when the ignition switch is in the "START"
position as a way to prove that the bulb and circuitry is
functioning correctly. It shouldn't come on in any other key
position. However, '67 has only one wire on the pressure
differential switch and doesn't have the Prove Out circuit
of the 2nd wire to make the warning light momentarily flash
in the start/crank ignition switch position. The '67
pressure differential switch takes a 1/2" wrench/socket to
remove/install. The '68-'72 pressure differential warning
switch will require a 9/16" wrench socket to remove install,
but the threads at the base of both switches are 3/8"-24, so
they can be physically interchanged at the valve body. |
|
The owner's manual
gives a brief description of the warning light and it's
function. Some truck owners misinterpret the 'brake warning
light' label as meaning parking brake, but it's actually for
the hydraulic portion of brakes. From the 1969 owner's
manual:
|
|
One myth that often pops up during
conversations is the misconception that if the spool in the
pressure differential valve gets pushed off-center due to
(for example) a brake line failure, it seals off the bad
side, allowing you to still have brake pressure on the good
side. This is incorrect! It is merely a warning
system. The ends of the spool are turned down to allow brake
fluid to pass when it is pushed to one side. If the spool
was designed to cut off the brake fluid to the side where
the pressure has dropped it would seal the fluid between the
master cylinder and the distribution block. This would cause
the brake pedal to be rock hard and you would have no brakes
at all because the trapped fluid would not give. The dual
master cylinder is the safety feature that allows pressure
at the good end. There is nothing inside the pressure
differential valve to replace when rebuilding except for two
special o-rings and a crush washer. |
|
Pressure Differential Valve Part Numbers |
|
1967-1972 |
| 67 |
F100 4x4 |
C7TZ-2B257-B |
| 68/ |
F100 4x4 |
C8TZ-2B257-B |
| 67 |
F100/250 4x2, F350 |
C7TZ-2B257-E |
| 68/ |
F100/250 4x2, F350 |
C8TZ-2B257-D |
| 67 |
F250 4x4 |
C7TZ-2B257-D |
| 68/ |
F250 4x4 |
C8TZ-2B257-C |
| 68/ |
F250/350 |
C8TZ-2B257-G |
|
Reseal kits are available
for some pressure differential valves through
www.MuscleCarResearch.com. These utilize the special
square O-rings necessary to withstand the corrosive nature
of brake fluid. Do not use Buna-N (Nitrile) o-rings in the
brake system as it is not a compatible material. Butyl or
EPDM are the only commonly available materials you should
use. Others include Virgin Teflon, Styrene Butadiene and
Aflas.
A rebuilding tutorial on
PDF is
also available
HERE.
NOTE: The only difference
between the drum/drum pressure differential valve used on
cars vs. trucks is their mounting brackets. The valve body
and internals/seals themselves are the same. |
|

|
|
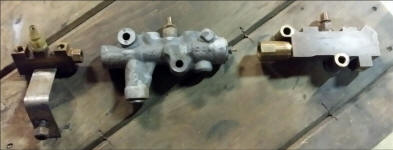 There
were several different types of pressure differential valves
used on the dentside-era ('73-'79) 2WD trucks. Primarily
though, there were two that were most commonly used. These
two are pictured here with the typical bumpside-era piece
(left). Usually the cast iron Kelsey-Hayes brake valve
(middle) was used in trucks 6,800 lbs or under and the brass
Weatherhead valve (right) was used in trucks over 6,800 lbs. There
were several different types of pressure differential valves
used on the dentside-era ('73-'79) 2WD trucks. Primarily
though, there were two that were most commonly used. These
two are pictured here with the typical bumpside-era piece
(left). Usually the cast iron Kelsey-Hayes brake valve
(middle) was used in trucks 6,800 lbs or under and the brass
Weatherhead valve (right) was used in trucks over 6,800 lbs.
|
|

|
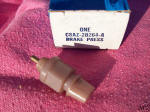
C8AZ-2B264-A - Brake
Pressure Differential Valve Warning Lamp Switch
Available from Ford and auto parts stores
1968/69 FoMoCo passenger cars
1968/79 F100/350, Bronco & Econoline
Some 1970/79 FoMoCo passenger cars |
 |
|

|
|
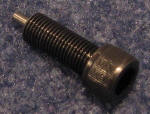
This is a Pressure Differential Switch Lock
Tool available from
MuscleCarResearch.com or
National Parts Depot. To use it, you first remove the
pressure differential switch from the main valve body and
install this in its' place, to hold the spool in a centered
position while the brakes are being serviced and/or bled. If
you remove the electrical switch and brake fluid seeps out,
the O-rings in your unit have failed and must be replaced.
Once the servicing is completed, you can remove this tool
and replace it with the electrical switch. |
 |

| Metering
Valve |


 |
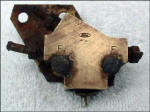
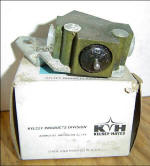
The stand-alone disc brake
metering valve
(a.k.a. "hold-off" valve) was only used
on '68-'72 F250/350 2WD trucks with the optional dual-piston
caliper front disc brakes. It's located on the left/rear
area of the main front frame crossmember and plumbed inline
into the front brake circuit between the brake pressure
differential valve and the front disc brake calipers.
The metering valve is just
a hydraulic pressure delay device. It gives the rear brake
circuit a little bit of a head start for the wheel cylinders
to fill with fluid, overcome the tension of the brake shoe
retracting springs and begin moving the shoes toward contact
with the drums, before the front discs begin to apply.
I don't know the specific pressure rating of these
particular metering valves but it's generally around 100 PSI
(give or take). Before this point, the metering poppet valve
is held closed by a coil spring, of a given wire diameter.
Once the pressure in the brake lines builds to a sufficient
level to overcome the tension and compress the poppet
against the spring, the poppet is forced open and brake
fluid and pressure are allowed to reach the brake calipers
thus, applying the front brakes in conjunction with the
rears. |
 |
And once again, it needs to
be stressed that this is NOT a proportioning valve!
 |
C8TZ-2B161-A .. Brake Pressure Metering Valve -
Use with disc brakes (Obsolete)
1968-72 F250 2WD & F350
1973-78 F350
1973-79 F250 2WD w/single or dual piston caliper front disc
brakes
1979 F350 2WD
|

| Combination Valve |
|
 |
 |
Left:
This is the combination valve as used on
'73-later trucks equipped with front drum and rear disc
brakes for trucks under 6,800# GVW. |
|
|
In
1973, Ford integrated the pressure differential valve and
the metering valve into a single valve body assembly on the
disc/drum trucks. And for the first time in the trucks, a third
function (proportioning) was also added to this integrated
brake valve assembly, so it now had 3 separate brake functions:
1) a metering valve (for the
front disc brakes)
2) a proportioning valve (for the rear drum
brakes)
3) the familiar brake pressure differential
valve (sensing in between the primary and secondary brake
circuits)
People often mistakenly
refer to this complete assembly as the proportioning valve...and
while that's
not entirely inaccurate, it's actually called a 'combo
valve' because it includes three different components with
completely different functions integrated into a single unit...it's
more than just a proportioning valve.
Contrary to popular belief, the
proportioning valve does not limit the pressure to the rear
brakes. It reduces the rate of pressure rise to the rear
brakes in proportion to the pressure being applied to the
front brakes
during a hard stop.
Regardless of what type of brakes a car has, the rear brakes
require less force than the front brakes. The amount of brake force
that can be applied to a wheel without locking it depends on
the amount of weight on the wheel. More weight means more
brake force can be applied. If you have ever slammed on your
brakes, you know that an abrupt stop makes your car lean
forward. The front gets lower and the back gets higher. This
is because a lot of weight is transferred to the front of
the car when you stop. Also, most cars have more weight over
the front wheels to start with because that is where the
engine is located.
If equal braking force
were applied at all four wheels during a stop, the rear
wheels would lock up before the front wheels. The
proportioning valve only lets a certain portion of the
pressure through to the rear wheels so that the front wheels
apply more braking force. If the proportioning valve were
set to 70 percent and the brake pressure were 1,000 pounds
per square inch (psi) for the front brakes, the rear brakes
would get 700 psi.
So how does it work? Well, under normal braking use, the
poppet of the proportioning valve sits dormant and does
nothing. This means under normal braking, the pressure being
applied to the front brakes is also the same pressure being
applied to the rears.
In the
event of a panic stop, the brakes' hydraulic
system experiences a sudden spike/rise in line pressures and there's a
sudden shift in vehicle weight from the rear to the front. The nose
dives and places more downward force on the front tires. The upward lift
of the rear unloads the weight over the rear tires.
This reduction in rear weight makes it very susceptible for the rear
drums to lock up. The abnormally-higher line pressures to the rear
causes the fluid to push on the poppet of the proportioning valve. This
overcomes the tension of the coil spring of the poppet valve and pushes
the valve over the fluid passage to create a partial blockage. This
reduces the opening of the valve body fluid passage and reduces the rate
of pressure rise being applied to the rear drums.
Factory proportioning circuits are engineered for the vehicle it's
installed on. Different vehicle GVWs will dictate the spring rating on
the proportioning poppet valve and when it will begin to
operate (knee-point of the pressure curve in proportion to
the pressure being applied to the front brakes).
Not all OEM proportioning valves come with
the same spring/pressure rating so they will not all become
active at the same pressure application point in the brake
system. So that's the reason Ford listed the proportioning
valves for the light 6200# GVW 4x2 F250 dentside pickups
with the F100/150s...and the heavier 6900#, 7500# and 8100#
GVW 4x2 F250s with the 4x2 F350s.
|
|
CLICK TO ENLARGE |
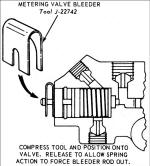
If you look at the front
end of the combo valve, there's a brass pin just in front of
a rubber boot. This is the metering valve bleeder and is
something you don't want to forget about when attempting to
bleed your front disc brakes. A special tool pulls
outward on the pin to allow the brake fluid to reach the
caliper assemblies. This operation is particularly important
if pressure bleeding is being used.
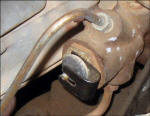
In a pinch, you
can use a small pair of ViseGrips to hold the pin out for
bleeding purposes, but it's recommended to either find the proper
tool or build yourself one from a piece of sheetmetal. |
CLICK TO ENLARGE |

|
|
| By Keith Dickson
(FORDification) and Steve Ainsworth (ultraranger) |
|
|
 |

Want to link to
this site? Please save this banner to your hard drive to place on your
webpage.
The correct link to use is
http://www.fordification.com
|