|
Sunday, February 4, 2007 - Well, a month
later. I actually got BOTH days this weekend to spend in the
shop. I spent yesterday doing research for the site for another
photo tutorial. I got home about 6PM and was up till 1:30AM this
morning putting that tutorial together and getting it posted. Then I was
up this morning at 8AM to head back to the shop to continue with
the driver's-side door skin.
I picked up a pair of '67 doors three years ago from a local
salvage yard to use with my project, but these would
have needed a little work, even though they were rust-free. But
then I decided to go with the '68-up style door instead, so these have
been sitting around the shop collecting dust. (I had one good
'67 door or one good '68-up door to choose from, and decided to
use the '67 so that I could keep the '68-up door as a spare.)
This door was removed from a '67 F100, but it's actually an F600
door...the VIN tag is still attached to it. The previous owner(s)
had installed several different rearview mirror configurations
on it, so there were several sets of holes that would have
needed filled, as well as a 6x9 speaker hole cut on the lower
interior side (Fig. 02).
If you recall from the last update, when I cut the damaged door
skin off, I left a slight bit of a lip, and was originally
intending to painstakingly cut the patch panel to fit exactly in
the area cut out. However, today I decided to attempt actually
removing the donor door's skin by undoing the factory's job of
wrapping the skin around the edges of the door. and spot-welding
it into place Fig. 03). And I'll just say this...it was a LOT
faster and easier doing it this way, and if I ever have to skin
a door again, I will definitely go this route. Prior to getting
started doing anything, I decided to spend a few minutes with a
3M stripping wheel chucked up in the angle grinder, just to make
sure that this door was straight and not full of body filler.
(This is why the door skin appears scuffed-up in these
pictures.) I was happy to find the skin in perfect shape and
would be a great donor.
I started off by going around the perimeter of the lip with a
wire brush. This was to clean off the paint so I could find the
factory spot-welds, which I then drilled out. (There were only a
few on each edge.) I just used a standard drill and bit,
drilling through the skin but not deep enough to enter to door
frame, just to minimize the possibility of accidentally drilling
through too far and damaging the outer skin. Once the spot-welds
were drilled out, I fired up the air chisel, and very gently
started popping the edge of the lip up. After several minutes of
starting to mangle things, I decided to customize one of my
chisel's bits (Fig. 04). Man, what a difference! I had the
entire lower portion of the door skin loose in about 3-4
minutes. The front and rear edges were a little trickier, mainly
around the beltline bump, but by being patient and taking my
time, I was able to get it with very little damage.
After the front, rear and lower crimps were straightened out, I
make a laid down a strip of masking tape along the upper valley
of the bump to use as a straightedge for making the top cut
(Fig. 06). That cut took about 15 minutes...and the panel was
off! (Fig. 07). All told, I probably spent two hours removing
this skin, but that included semi-frequent breaks, as well as
modifying the chisel and just trying different methods to see
what worked best. Now that I know how it's done, I'd bet I could
cut that time in half.
The new skin was cut so that the joint would be right in the
middle of the valley above the bump. I figured this would be the
easiest place to hide it. This was also because instead of
butt-welding it, like you should normally do with body panels, I
was going to lap-weld this in place....that is, I was going to
overlap the two pieces.
I then cleaned up the top edge of the skin where the welding
would be done, and marked/drilled holes every inch. I also spent
a few minutes cleaning the backside of the skin with a wire
wheel attachment, so that I could coat the backside with POR-15
once it was welded into place.
Next on the list was removing the pinch lip on the choptop's
door. That went fast...about 20 minutes worth of work...and the
new panel was ready for trial-fitting. To install the new skin,
I first had to slip it into place and loosely crimp it all the
way around the perimeter. I wanted it snug but not tight, in
case I needed to adjust things a little as I was getting started
welding this up. Since both door originally had side trim, there
were factory trim holes drilled at the front and rear edges of
the door, and I used these holes to ensure the panel was
properly aligned....and then started welding. |
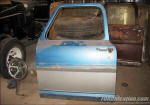
Fig. 01 - Here's the
obligatory 'before' picture of the '67 donor door.
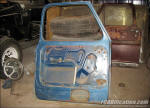
Fig. 02 - Here you can see the speaker hole that was cut
out by a previous owner.
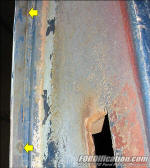
Fig. 03 - Here's a shot showing how the factory wrapped
the door skin around the edge and spot-welded it into place.
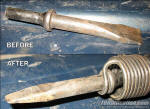
Fig. 04 - I ground down one of my chisels to make the
skin removal easier.

Fig. 05 - A view of the straightened-out door lip.

Fig. 06 - After the factory crimps were straightened out,
I laid a line of masking tape to use as a straightedge for the
upper cut.
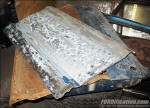
Fig. 07 - The door skin removed.
|