Getting started on the choptop truck...
Moderator: FORDification
-
layedout72
- Blue Oval Guru

- Posts: 1280
- Joined: Fri Apr 21, 2006 5:11 pm
- Location: Mississippi, Hattiesburg
re: Getting started on the choptop truck...
looks good so far keith. i may pull my springs a little later on and cut a coil off each side.
-
wt4speed#2

- Blue Oval Guru
- Posts: 1064
- Joined: Fri Mar 25, 2005 9:21 pm
- Location: Texas, Ft. Worth
Re: re: Getting started on the choptop truck...
And it probably won't with the stock width tires , with a wider tire mine is pretty pronounced , I took out one complete coil the first go, then later went back and took a second coil and 1/4 to coil and 1/2 making 2 1/4-2 1/2 total was definitely noticeable . If you plan on running a wider profile than is on the front I'd try'em now and look at it again. Just myFORDification wrote:Since the two coils I cut from the front springs hasn't adversely affect the camber, I'm probably going to try one more coil and see how that looks.

-
FORDification

- Site & Forum Admin

- Posts: 8050
- Joined: Sun Jul 11, 2004 12:52 am
- Location: Kansas, Wellsville
- Contact:
re: Getting started on the choptop truck...
Hmmm...thanks for the input, guys. I'm actually not planning on running wider tires, but I'm just kinda winging this, so who knows what the future holds. However, I will wait to trim the coils any more until the truck is completely reassembled, since the addition of the additional weight of the front fenders, hood, grille, bumper, etc. might cause it to drop a bit more. I don't think it looks too bad right now, though a little more drop would be kinda cool. However, the main priority here is the looks...if I need to trim some more, so be it, and I'll just bend the I-beams to compensate. I'm actually kinda determined to get the drop I want WITHOUT having to resort to any aftermarket parts like drop beams or coils. I just wanna be able to say I did it. 
____| \__
-O-----O- Keith
'67 F-100 2WD SWB ~ '69 F-100 4WD SWB w/7" chop ~ 1975 F-250 Ranger XLT Supercab Camper Special

My '67 restoration video
-> Posting and you! <-a MUST watch for all!!
-O-----O- Keith
'67 F-100 2WD SWB ~ '69 F-100 4WD SWB w/7" chop ~ 1975 F-250 Ranger XLT Supercab Camper Special
My '67 restoration video
-> Posting and you! <-a MUST watch for all!!
-
FORDification
- Site & Forum Admin
- Posts: 8050
- Joined: Sun Jul 11, 2004 12:52 am
- Location: Kansas, Wellsville
- Contact:
re: Getting started on the choptop truck...
Just a quick update: I got to spend about four hours in the shop today. Got the backside of the front fenders painted with POR-15 and topcoated with Krylon. Then I got started stripping paint in the cab interior, got about 1/3 done (the easy stuff). I'll have probably another full day's worth of work finishing that task up.
Anyway, I'll get the fenders mounted onto the truck for the final time on Sunday and will get the minor imperfections filled and sanded down. Hopefully by Sunday night the outside of the fenders will be ready for paint. I'm also hoping to have the upper and lower valance panels and front bumper stripped and painted.
Anyway, I'll get the fenders mounted onto the truck for the final time on Sunday and will get the minor imperfections filled and sanded down. Hopefully by Sunday night the outside of the fenders will be ready for paint. I'm also hoping to have the upper and lower valance panels and front bumper stripped and painted.
____| \__
-O-----O- Keith
'67 F-100 2WD SWB ~ '69 F-100 4WD SWB w/7" chop ~ 1975 F-250 Ranger XLT Supercab Camper Special
My '67 restoration video
-> Posting and you! <-a MUST watch for all!!
-O-----O- Keith
'67 F-100 2WD SWB ~ '69 F-100 4WD SWB w/7" chop ~ 1975 F-250 Ranger XLT Supercab Camper Special
My '67 restoration video
-> Posting and you! <-a MUST watch for all!!
-
FORDification
- Site & Forum Admin
- Posts: 8050
- Joined: Sun Jul 11, 2004 12:52 am
- Location: Kansas, Wellsville
- Contact:
re: Getting started on the choptop truck...
Well, I didn't get quite as much done today as I'd have liked, but it was still productive.
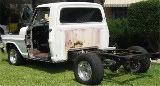
I got the radiator support cinched down, after modifying the front support bushings. Since I didn't have any good used bushings, I had to modify a pair of rear cab bushings. Those are about 1/4" too tall, so I had to cut them down to fit. Then I got the fenders mounted, though it took longer than I thought. The driver's fender gave me a hard time trying to get it to fit and line up. Ended up having to also realign the driver's door as well as a little surgery with a BFH to the door post to get the fender to fit smoothly....but it eventually made it on and looks good.
I also got the the upper and lower valance panels stripped and got the lower valance painted. Then I got the front painted bumper stripped down, and got the backside painted.
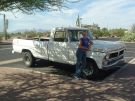
Here's a picture of the truck as it sits now.

As you can see, right now there's a larger-than-normal gap between the fender and cowl. That's because it appears as if I need to shim the front cab mounts to life the front of the cab up, which will bring the fenders up too. However, I'll wait to do that until I have the bed mounted, so I can line everything up at once. In this picture the grille and bare-metal upper valance panel were just trial-fitted to ensure proper fender alignment, they'll both come off one more time, and the bare-metal front bumper was just sitting there for the visual. The hood is also down to bare metal, and I kinda wanted to throw it on to complete the picture of the whole front clip being shiny, but it was buried at the back of the shop and I wasn't feeling that energetic. Too bad, as the hood I'm planning on using is the one I previously modified for the shaker scoop setup, and it would have been an awesome shot.
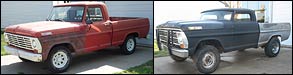
I also did a little spring cleaning in the shop, since I had a full winter's worth of garbage and spare parts laying around, so much so that it was getting really hard to get around. It was a beautiful day today, so I pushed the truck out into the driveway. Here's a comparison shot...the first shot was taken the day I got this truck, the second shot was taken this afternoon.

Not lookin' too shabby, huh? I mean, it's still got a ways to go, but there's some definitely progress being made.
I got the radiator support cinched down, after modifying the front support bushings. Since I didn't have any good used bushings, I had to modify a pair of rear cab bushings. Those are about 1/4" too tall, so I had to cut them down to fit. Then I got the fenders mounted, though it took longer than I thought. The driver's fender gave me a hard time trying to get it to fit and line up. Ended up having to also realign the driver's door as well as a little surgery with a BFH to the door post to get the fender to fit smoothly....but it eventually made it on and looks good.
I also got the the upper and lower valance panels stripped and got the lower valance painted. Then I got the front painted bumper stripped down, and got the backside painted.
Here's a picture of the truck as it sits now.
As you can see, right now there's a larger-than-normal gap between the fender and cowl. That's because it appears as if I need to shim the front cab mounts to life the front of the cab up, which will bring the fenders up too. However, I'll wait to do that until I have the bed mounted, so I can line everything up at once. In this picture the grille and bare-metal upper valance panel were just trial-fitted to ensure proper fender alignment, they'll both come off one more time, and the bare-metal front bumper was just sitting there for the visual. The hood is also down to bare metal, and I kinda wanted to throw it on to complete the picture of the whole front clip being shiny, but it was buried at the back of the shop and I wasn't feeling that energetic. Too bad, as the hood I'm planning on using is the one I previously modified for the shaker scoop setup, and it would have been an awesome shot.
I also did a little spring cleaning in the shop, since I had a full winter's worth of garbage and spare parts laying around, so much so that it was getting really hard to get around. It was a beautiful day today, so I pushed the truck out into the driveway. Here's a comparison shot...the first shot was taken the day I got this truck, the second shot was taken this afternoon.
Not lookin' too shabby, huh?
____| \__
-O-----O- Keith
'67 F-100 2WD SWB ~ '69 F-100 4WD SWB w/7" chop ~ 1975 F-250 Ranger XLT Supercab Camper Special
My '67 restoration video
-> Posting and you! <-a MUST watch for all!!
-O-----O- Keith
'67 F-100 2WD SWB ~ '69 F-100 4WD SWB w/7" chop ~ 1975 F-250 Ranger XLT Supercab Camper Special
My '67 restoration video
-> Posting and you! <-a MUST watch for all!!
-
theskytoucher

- Preferred User

- Posts: 471
- Joined: Wed Jun 07, 2006 2:53 pm
- Location: Arizona, Cottonwood
- Contact:
re: Getting started on the choptop truck...
Very nice!!! Very Nice!!!
-Troy-
1996 Dodge ram 1500 4x4
1976 Ford F-150 4x4
Quando Omni Flunkus Mortadi
When all else Fails Play Dead
1996 Dodge ram 1500 4x4
1976 Ford F-150 4x4
Quando Omni Flunkus Mortadi
When all else Fails Play Dead
-
SmokeyBear

- Preferred User
- Posts: 367
- Joined: Tue Sep 27, 2005 8:41 am
- Location: Kentucky
yes
man, that is so baddddd asssss!!!
70 F-100 XLT
"Christine" Gone but not forgotten.
72 F-100 Ranger XLT
"Christine" Gone but not forgotten.
72 F-100 Ranger XLT
-
alvinator
- Preferred User
- Posts: 369
- Joined: Wed Mar 09, 2005 3:57 pm
- Location: Texas, Rowlett
re: Getting started on the choptop truck...
doing great work there Keith
-
trukcrazy

- Blue Oval Fanatic

- Posts: 905
- Joined: Sat Apr 02, 2005 8:55 am
- Location: Gulf Breeze, Florida, USA
re: Getting started on the choptop truck...
Keith, with the rake you have going on I don't think that chop is going to look so severe when you are finished. Looks good.
John, #424
1967 F250 crewcab x 2.
2010 Dodge Ram 1500 Sport Quadcab
2008 Challenger SRT8
1967 F250 crewcab x 2.
2010 Dodge Ram 1500 Sport Quadcab
2008 Challenger SRT8
-
dablack00

- Blue Oval Fan

- Posts: 695
- Joined: Wed Jan 12, 2005 7:32 am
- Location: Texas, Lufkin
re: Getting started on the choptop truck...
How is shimming the front cab mounts going to fix the fender/cowl gap?
I see this gap all the time. Its pretty bad on my truck. I eager to see how you fix it.
thanks
Austin
I see this gap all the time. Its pretty bad on my truck. I eager to see how you fix it.
thanks
Austin
-
GT-Racer

- Preferred User
- Posts: 417
- Joined: Thu Jul 22, 2004 6:33 pm
- Location: West Virginia, Parkersburg
Absolutley BADASS. That doesnt even look like the same truck. I wouldnt change a lot more myself. Real hot rods dont have hoods...  )
)
'67 F100 2wd shortbed - Beginning restoration.
351w, 5-speed, 3:70 gears (someday)
Drivin' a Chevy is Kinda Like wipin' before you poop, it just don't make no sense....
351w, 5-speed, 3:70 gears (someday)
Drivin' a Chevy is Kinda Like wipin' before you poop, it just don't make no sense....
-
wt4speed#2
- Blue Oval Guru
- Posts: 1064
- Joined: Fri Mar 25, 2005 9:21 pm
- Location: Texas, Ft. Worth
-
FORDification
- Site & Forum Admin
- Posts: 8050
- Joined: Sun Jul 11, 2004 12:52 am
- Location: Kansas, Wellsville
- Contact:
re: Getting started on the choptop truck...
I'll agree that it does kinda look cool without a hood, but with nothing more than a stock (and dirty) 302 in there, I'd almost be embarrassed to be seen! It's definitely getting the shaker scoop setup with the hood, which will be shaved of all the emblems.
I did get to spend another day in the shop today, spent most of it doing bodywork. Man, that's a messy freakin' job! By the time I got home I was covered with so much sanding dust that I looked like a ghost.
Anyway, I got the lower valance mounted, got the upper valance painted and ready to install, and got the hood hinges cleaned up and ready to paint, and got one of them painted. I'm doing the hinges like everything else...getting it cleaned up with the wire wheel and sandpaper, then giving it a coat of POR-15 and then a couple coats of Semi-Flat Krylon. However, I used up my last foam brush painting the first hinge, and even though I had a case of them at the house, I forgot to bring them to the shop, so the second hinge will have to wait till next time. I also got the front bumper painted and ready to install.
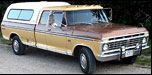
I then spent the rest of the day sanding and filling and sanding and filling and.....well, you get the idea. I'm about 80% done with the exterior bodywork on the front-end sheetmetal, I've got probably one more day's worth of finishing before it'll be ready for paint. Most of the bodywork I'm doing is just door dings, though I'm also filling a few trim holes and finishing smoothing off the seam on the driver's door where I welded in the lower door skin. Here's one shot taken late this afternoon:

I did get to spend another day in the shop today, spent most of it doing bodywork. Man, that's a messy freakin' job! By the time I got home I was covered with so much sanding dust that I looked like a ghost.
Anyway, I got the lower valance mounted, got the upper valance painted and ready to install, and got the hood hinges cleaned up and ready to paint, and got one of them painted. I'm doing the hinges like everything else...getting it cleaned up with the wire wheel and sandpaper, then giving it a coat of POR-15 and then a couple coats of Semi-Flat Krylon. However, I used up my last foam brush painting the first hinge, and even though I had a case of them at the house, I forgot to bring them to the shop, so the second hinge will have to wait till next time. I also got the front bumper painted and ready to install.
I then spent the rest of the day sanding and filling and sanding and filling and.....well, you get the idea. I'm about 80% done with the exterior bodywork on the front-end sheetmetal, I've got probably one more day's worth of finishing before it'll be ready for paint. Most of the bodywork I'm doing is just door dings, though I'm also filling a few trim holes and finishing smoothing off the seam on the driver's door where I welded in the lower door skin. Here's one shot taken late this afternoon:
____| \__
-O-----O- Keith
'67 F-100 2WD SWB ~ '69 F-100 4WD SWB w/7" chop ~ 1975 F-250 Ranger XLT Supercab Camper Special
My '67 restoration video
-> Posting and you! <-a MUST watch for all!!
-O-----O- Keith
'67 F-100 2WD SWB ~ '69 F-100 4WD SWB w/7" chop ~ 1975 F-250 Ranger XLT Supercab Camper Special
My '67 restoration video
-> Posting and you! <-a MUST watch for all!!
-
Heavenlyfire

- Blue Oval Fan
- Posts: 598
- Joined: Sun May 01, 2005 8:40 pm
- Location: Arizona, Mesa
- Contact:
re: Getting started on the choptop truck...
Oh man that thing is looking mean . Can't wait to see it on the road.

-
rjewkes

- 100% FORDified!

- Posts: 3711
- Joined: Sun Apr 17, 2005 1:09 am
- Location: Missouri, Webb City
- Contact:
Are you shaving the door handles too or did they come shaved?
"It is better to keep your mouth shut and appear stupid than to open it and remove all doubt." - Mark Twain
'70 f250 4x4 Crew cab 460/C6 '72 F100 390/C6 9.8 MPG AVG. '89 Mercury Cougar LS Dual Exh. V6 . 18.9 MPG AVG. In Town.

I don't want to give em a heart-attack. That is what would happen if I answered the door in the buff. Heck it almost scares me to death when I step out of the shower and look in the mirror.~Mancar1~
fuelly.com
'70 f250 4x4 Crew cab 460/C6 '72 F100 390/C6 9.8 MPG AVG. '89 Mercury Cougar LS Dual Exh. V6 . 18.9 MPG AVG. In Town.
I don't want to give em a heart-attack. That is what would happen if I answered the door in the buff. Heck it almost scares me to death when I step out of the shower and look in the mirror.~Mancar1~
fuelly.com