Project "Uncle Fester"- 9/21 Interior almost finished
Moderator: FORDification
- pincheweddo
- Preferred User

- Posts: 363
- Joined: Mon Sep 14, 2009 11:59 pm
- Location: Texas, Fort Worth
- Contact:
Re: Project "Uncle Fester"- 4/20 NEW WINDSHIELD
Nice write up on the windows. I am going to be doing the same soon. What kind of sealant did you use?
P.S. Windex can jack stuff up. I am glad you salvaged the situation.
P.S. Windex can jack stuff up. I am glad you salvaged the situation.
- 72stepside
- Blue Oval Fan

- Posts: 537
- Joined: Tue May 09, 2006 10:31 pm
- Location: Florida, Milton
- Contact:
Re: Project "Uncle Fester"- 4/20 NEW WINDSHIELD
No sealant is required on these windows. They are held in VERY tightly by a gasket. I've never found sealant on any that I've removed nor have I heard of sealing them in on the many posts I've read on fordification.
Chris
72 F100 Stepside w/ 78 300 CID
Hedman Headers
Disc Brakes
Power Steering with 3 STILL on the tree
Comfy Crown Vic Seats
71 F250 PS, PB, AC, Auto, 390
Loooong way to go on this one!


72 F100 Stepside w/ 78 300 CID
Hedman Headers
Disc Brakes
Power Steering with 3 STILL on the tree
Comfy Crown Vic Seats
71 F250 PS, PB, AC, Auto, 390
Loooong way to go on this one!


- Calfdemon
- 100% FORDified!

- Posts: 2672
- Joined: Tue May 25, 2010 11:31 pm
- Location: California, Santa Clarita
Re: Project "Uncle Fester"- 4/20 NEW WINDSHIELD
Yeah, this is not the first I have heard of how hard this is. Unfortunately, I have this to look forward to myself. My window trim was too pristine NOT to try and re-use, and I already have ordered the window rubber with the groove. So eventually when my truck is done with body and paint, I will have the joy of trying to get mine in as well. I have put windshields in without the trim a few times now without any issues, but tackling the trim is a whole new experience...72stepside wrote: Installing the stainless windshield trim is no small task. I hired a windshield installer to do the work on the side and it was still tough. We fit the gasket to the windshield, put in the top trim, then the sides, THEN CAME THE BOTTOM!! Oh my what a pain. The curve of the window and the curve of the stainless didn't cooperate with one another. We'd get the curve in, then the middle would pop the gasket off the glass. We ended up strapping the gasket to the glass, installing the curve part first, then the middle. Finally got it all together. Then came the easy part... roping the glass into the truck. Once the glass is in and set, the gasket groove for the stainless gets REAL TIGHT!!! That trim isn't coming out! The windshield took an hour and a half. The rear window took about 10 minutes... no trim there! The rear gasket came with a trim groove, which is not what I ordered. Once in the truck, the fit was so tight that you can't even tell there is a groove. I'll live with it. I told the installer that if this windshield ever needs to be replaced, the stainless will be available on Ebay to someone else!!
-Rich
Current toys -
69 Ford F350 Crew Cab - 460 / C6 - http://i253.photobucket.com/albums/hh67 ... lqgskp.jpg
31 Ford Vicky - 1955 270 Red Ram Hemi / 4 speed - http://i253.photobucket.com/albums/hh67 ... bsibvn.jpg
Former toys -
67 Pontiac Firebird 400 convertible (sold 9/13) - http://i253.photobucket.com/albums/hh67 ... bird-1.jpg
67 Ford Fairlane GT - 390 / 4 speed (sold 7/15) - http://i253.photobucket.com/albums/hh67 ... c5hu8z.jpg
- 72stepside
- Blue Oval Fan

- Posts: 537
- Joined: Tue May 09, 2006 10:31 pm
- Location: Florida, Milton
- Contact:
Re: Project "Uncle Fester"- 4/20 NEW WINDSHIELD
One thing that I figured out as we went was that the lower pieces may have gone in better had we laid the glass on the bench with the outside down. The glass flexed some under its own weight. This was in counter to the bend in the trim piece. The only thing is that you'd have to work upside down. I hope that makes sense.
I think this is a two man job. I don't see how one person could do it.
I think this is a two man job. I don't see how one person could do it.
Chris
72 F100 Stepside w/ 78 300 CID
Hedman Headers
Disc Brakes
Power Steering with 3 STILL on the tree
Comfy Crown Vic Seats
71 F250 PS, PB, AC, Auto, 390
Loooong way to go on this one!


72 F100 Stepside w/ 78 300 CID
Hedman Headers
Disc Brakes
Power Steering with 3 STILL on the tree
Comfy Crown Vic Seats
71 F250 PS, PB, AC, Auto, 390
Loooong way to go on this one!


- Calfdemon
- 100% FORDified!

- Posts: 2672
- Joined: Tue May 25, 2010 11:31 pm
- Location: California, Santa Clarita
Re: Project "Uncle Fester"- 4/20 NEW WINDSHIELD
Thanks, I will give the upside down technique a shot when doing it. I will have someone helping me when I do it anyway. Even installing the windshield is a 2 man job. Without the outside pressure, you cannot get the rubber to stay in place when pulling the rope, so there will be at least 2 of us doing this. Thanks for the tips and hopefully I will be doing this sooner than later. But the body and paint on my truck is taking its sweet time...
-Rich
Current toys -
69 Ford F350 Crew Cab - 460 / C6 - http://i253.photobucket.com/albums/hh67 ... lqgskp.jpg
31 Ford Vicky - 1955 270 Red Ram Hemi / 4 speed - http://i253.photobucket.com/albums/hh67 ... bsibvn.jpg
Former toys -
67 Pontiac Firebird 400 convertible (sold 9/13) - http://i253.photobucket.com/albums/hh67 ... bird-1.jpg
67 Ford Fairlane GT - 390 / 4 speed (sold 7/15) - http://i253.photobucket.com/albums/hh67 ... c5hu8z.jpg
Current toys -
69 Ford F350 Crew Cab - 460 / C6 - http://i253.photobucket.com/albums/hh67 ... lqgskp.jpg
31 Ford Vicky - 1955 270 Red Ram Hemi / 4 speed - http://i253.photobucket.com/albums/hh67 ... bsibvn.jpg
Former toys -
67 Pontiac Firebird 400 convertible (sold 9/13) - http://i253.photobucket.com/albums/hh67 ... bird-1.jpg
67 Ford Fairlane GT - 390 / 4 speed (sold 7/15) - http://i253.photobucket.com/albums/hh67 ... c5hu8z.jpg
- 72stepside
- Blue Oval Fan

- Posts: 537
- Joined: Tue May 09, 2006 10:31 pm
- Location: Florida, Milton
- Contact:
Re: Project "Uncle Fester"- 6/2 Headliner and more
Been working pretty steady on the interior.
I drug out the heater box and found that it was pretty trashed. I found the accordion rubber piece from the fresh air inlet to the heater box was broken, my cables were either frozen or broken, blower switch had fallen apart, my duct work was rotten, and I knew the heater core had a hole in it. I was in town a few weeks ago so I thought I'd swing into the u-pull-it yard just to see what they had. The haven't had any bumps in there in about a year. I'm glad I stopped because they had a 71 F-250 there with a complete heater system. All the pieces were present so I got it all!!! I got some duct work from an early 60's F100 (not rotten) and I swiped a nice day/night rearview mirror from a van. All of that for only $20! Pics to come of these items as I install them.
I decided I'd work from the top down so that I wouldn't drop anything on a new part and mess it up (mostly the dashpad).
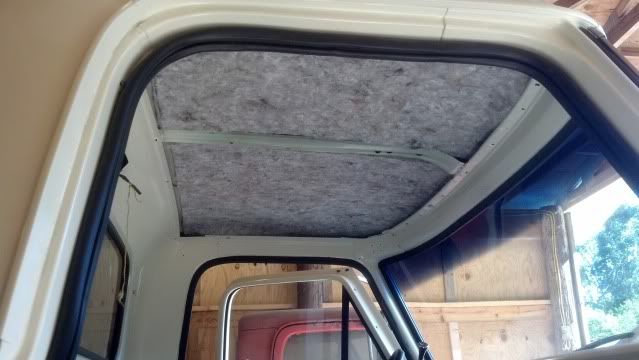
I have been back and forth with what I was going to use to insulate the roof, the back of the cab, and the floor area under the seat (carpet came with jute backing to handle the floor, but not under the seat). I had landed on the old fiber jute carpet padding, mainly due to cost and I was worried about asphalt smell with the peel and stick roofing and the Florida heat. None of the carpet stores around here had that padding so I was gonna get some off ebay until I saw what the shipping charge was going to be. I found some on Amazon.com with free shipping. $70 dollars later I got enough to do the roof, the back of the cab, the floor under the seat, and enough left over to do the roof on my other truck (someday). I stuck it on with brush on contact cement.
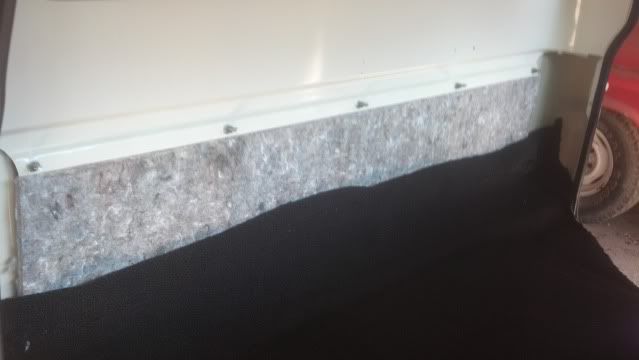
Here's the back of the cab with the carpet laid up over it.
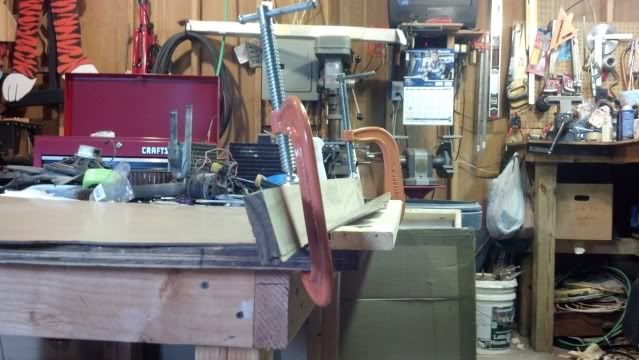
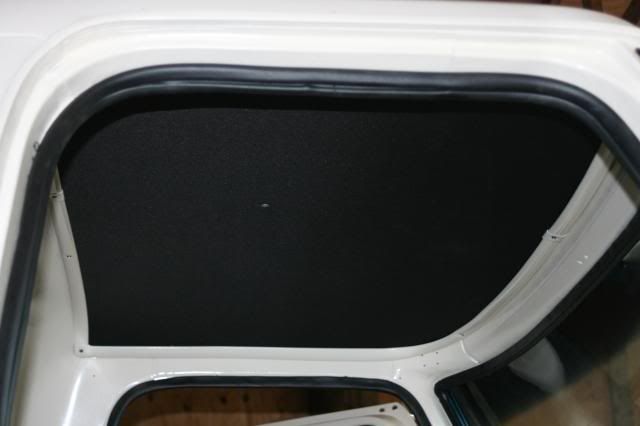
My headliner was long gone. I had bought one years ago so I unpacked it. It was a grey perforated type. It was trashed around the edges . I had forgotted there was chrome headliner trim in the box. It has rusted and I don't know if I'll ever be able to use it now. No worries though because we painted my headliner trim when we painted the truck. I got a piece of 1/8" thick hardboard to use. I was able to use the perforated liner for a pattern. I traced it with a silver sharpie (these are great cause you can really see them on almost all colors of media) then attempted to cut it with a utility knife. After a minute or two, I decided to go load a fine blade in my saber saw. Cut it like a hot knife through butter with no rips or tears. I used some C clamps and board to form the curve on the edges, but found the screws to hold it to the roof took care of most of that themselves.
I had to figure out what kind of material to use for a cover. I went to Wal-Mart of all places and found some heavy duty black material with a thin vinyl backing. This would be great to keep the contact cement from bleeding through. I laid the new headliner board on the vinyl side and traced with the silver sharpie with about a 1 inch offset so I could wrap material around the board. I used 3M high strength spray contact cement to bond them together.
Here's how I put the curve on the edges. You have to be careful not to go too far or you'll put a crease in the board. I let each end sit like this for 24 hours.
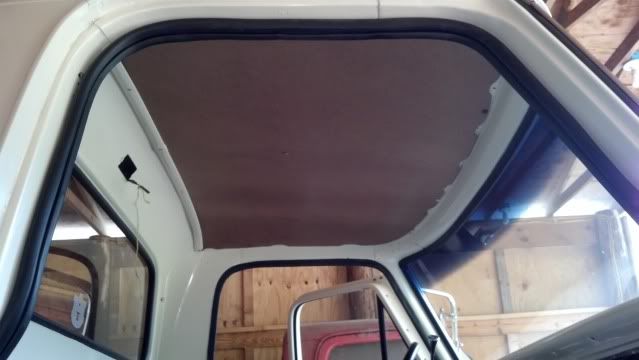
Here is a test fitting in the truck.
And finally, here it is with the material stuck on it and all the trim installed. The board is strong enough so that you can set the middle screw and work your way around the edge with the other screws. This is the 'one man' technique I used!
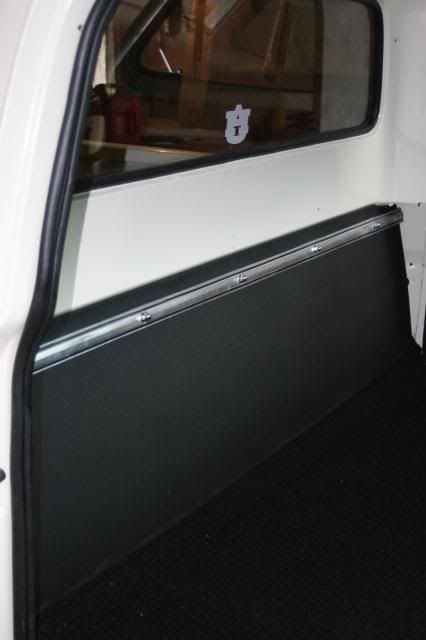
I needed to put something along the back of the cab to hide my new insulation and to fill the area in where the tank was. I had some left over hardboard from another project that was just the right height to fill it in. I had to trim and cut to make it fit the little odd lips and bumps on the edges. I planned ahead and bought enough of the black cloth to cover this area as well. I had put some stainless carriage bolts in the tank bolt holes before I put the bed on knowing I'd need them to secure this screen into place. I wasn't sure what I would use to hold it all down. I thought about a piece of 1x2 painted black and fastened with some stainless acorn nuts, but I couldn't find a piece of that size of lumber laying around the shop. THEN IT HIT ME... I had a piece of bed side trim that was in really good shape except it had two screw holes in it where the previous owner made a repair. I knew I'd never put it back on the truck that way so I thought I'd use it to hold my screen on. Would you believe the holes lined up with the bolts in the cab?!?!?!? I'm still in shock. So, I marked where the holes needed to be, drilled them, then cut the ends off so it would fit. It's not perfect, but I'm really thrilled with how well it turned out.
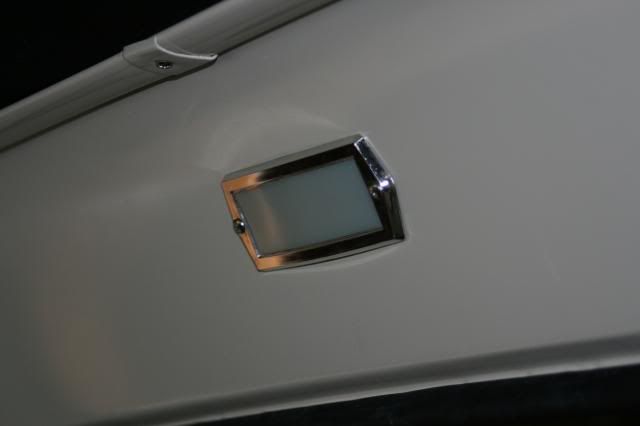
I also got the dome light installed after I picked the bird nest out of the hole.
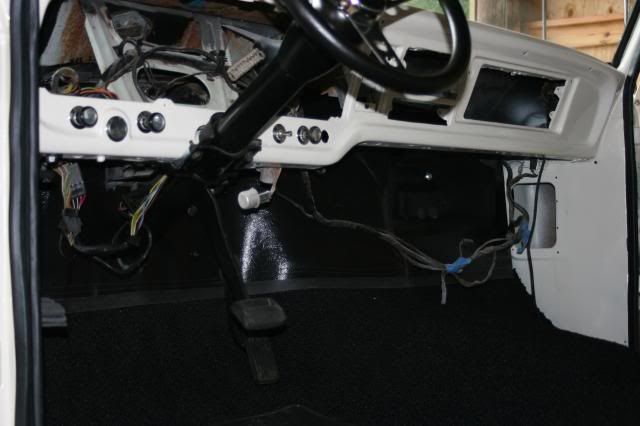
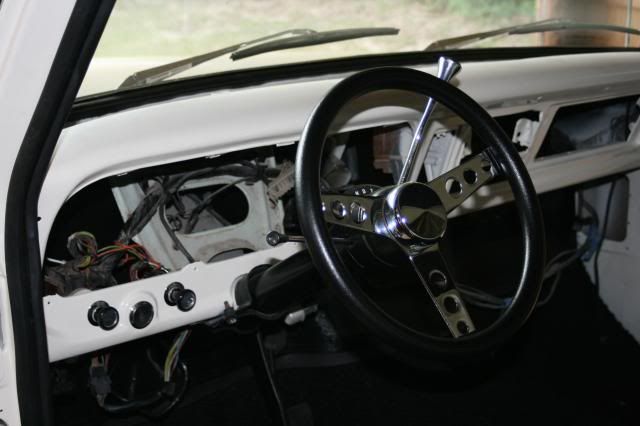
I got my firewall protector and carpet installed as well. I fastened the firewall protector to the truck with button head allen screws and washers that I painted black since I only had 3 of the stock fasteners that probably wouldn't have held anyway. I admit that I cheated and slit the area below the steering column instead of taking the column back out. You have to look carefully to see it. I also got the switches installed minus the cigar lighter.
I finally got around to installing the steering wheel. I got sick of that old broken green wheel. I put in high/low horns from a 64 Galaxie for a nice sound. My Father had to take them apart because the points were glazed over. Yes, horns have point contacts that make them work. I had no idea. It took a good bit of cleaning but they finally became functional.
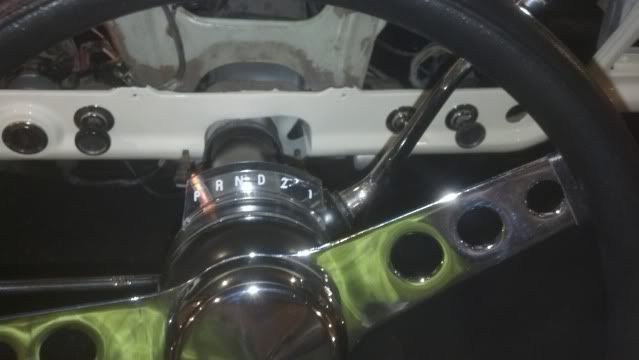
Now I can tell what gear I'm in! I painted the needle with some orange model car paint.
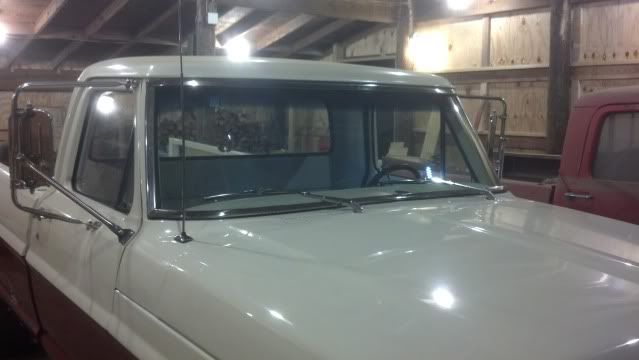
I also put on my radio antenna and windshield wipers.
That's about it for now. Stay tuned...
I drug out the heater box and found that it was pretty trashed. I found the accordion rubber piece from the fresh air inlet to the heater box was broken, my cables were either frozen or broken, blower switch had fallen apart, my duct work was rotten, and I knew the heater core had a hole in it. I was in town a few weeks ago so I thought I'd swing into the u-pull-it yard just to see what they had. The haven't had any bumps in there in about a year. I'm glad I stopped because they had a 71 F-250 there with a complete heater system. All the pieces were present so I got it all!!! I got some duct work from an early 60's F100 (not rotten) and I swiped a nice day/night rearview mirror from a van. All of that for only $20! Pics to come of these items as I install them.
I decided I'd work from the top down so that I wouldn't drop anything on a new part and mess it up (mostly the dashpad).
I have been back and forth with what I was going to use to insulate the roof, the back of the cab, and the floor area under the seat (carpet came with jute backing to handle the floor, but not under the seat). I had landed on the old fiber jute carpet padding, mainly due to cost and I was worried about asphalt smell with the peel and stick roofing and the Florida heat. None of the carpet stores around here had that padding so I was gonna get some off ebay until I saw what the shipping charge was going to be. I found some on Amazon.com with free shipping. $70 dollars later I got enough to do the roof, the back of the cab, the floor under the seat, and enough left over to do the roof on my other truck (someday). I stuck it on with brush on contact cement.

Here's the back of the cab with the carpet laid up over it.

My headliner was long gone. I had bought one years ago so I unpacked it. It was a grey perforated type. It was trashed around the edges
I had to figure out what kind of material to use for a cover. I went to Wal-Mart of all places and found some heavy duty black material with a thin vinyl backing. This would be great to keep the contact cement from bleeding through. I laid the new headliner board on the vinyl side and traced with the silver sharpie with about a 1 inch offset so I could wrap material around the board. I used 3M high strength spray contact cement to bond them together.
Here's how I put the curve on the edges. You have to be careful not to go too far or you'll put a crease in the board. I let each end sit like this for 24 hours.

Here is a test fitting in the truck.

And finally, here it is with the material stuck on it and all the trim installed. The board is strong enough so that you can set the middle screw and work your way around the edge with the other screws. This is the 'one man' technique I used!

I needed to put something along the back of the cab to hide my new insulation and to fill the area in where the tank was. I had some left over hardboard from another project that was just the right height to fill it in. I had to trim and cut to make it fit the little odd lips and bumps on the edges. I planned ahead and bought enough of the black cloth to cover this area as well. I had put some stainless carriage bolts in the tank bolt holes before I put the bed on knowing I'd need them to secure this screen into place. I wasn't sure what I would use to hold it all down. I thought about a piece of 1x2 painted black and fastened with some stainless acorn nuts, but I couldn't find a piece of that size of lumber laying around the shop. THEN IT HIT ME... I had a piece of bed side trim that was in really good shape except it had two screw holes in it where the previous owner made a repair. I knew I'd never put it back on the truck that way so I thought I'd use it to hold my screen on. Would you believe the holes lined up with the bolts in the cab?!?!?!? I'm still in shock. So, I marked where the holes needed to be, drilled them, then cut the ends off so it would fit. It's not perfect, but I'm really thrilled with how well it turned out.

I also got the dome light installed after I picked the bird nest out of the hole.

I got my firewall protector and carpet installed as well. I fastened the firewall protector to the truck with button head allen screws and washers that I painted black since I only had 3 of the stock fasteners that probably wouldn't have held anyway. I admit that I cheated and slit the area below the steering column instead of taking the column back out. You have to look carefully to see it. I also got the switches installed minus the cigar lighter.

I finally got around to installing the steering wheel. I got sick of that old broken green wheel. I put in high/low horns from a 64 Galaxie for a nice sound. My Father had to take them apart because the points were glazed over. Yes, horns have point contacts that make them work. I had no idea. It took a good bit of cleaning but they finally became functional.

Now I can tell what gear I'm in! I painted the needle with some orange model car paint.

I also put on my radio antenna and windshield wipers.

That's about it for now. Stay tuned...
Chris
72 F100 Stepside w/ 78 300 CID
Hedman Headers
Disc Brakes
Power Steering with 3 STILL on the tree
Comfy Crown Vic Seats
71 F250 PS, PB, AC, Auto, 390
Loooong way to go on this one!


72 F100 Stepside w/ 78 300 CID
Hedman Headers
Disc Brakes
Power Steering with 3 STILL on the tree
Comfy Crown Vic Seats
71 F250 PS, PB, AC, Auto, 390
Loooong way to go on this one!


- Coupe5oh
- New Member

- Posts: 134
- Joined: Sun Nov 13, 2011 3:10 pm
- Location: Rolla, MO
Re: Project "Uncle Fester"- 6/2 Headliner and more
That looks great. I've been debating on what to use for my headliner, is the board something Lowes would carry?
-1993 Cobra #121, Black/ Grey leather
-1968 Mustang GT Fastback, Gulfstream Aqua
-1967 f100 pile of parts...
-1968 Mustang GT Fastback, Gulfstream Aqua
-1967 f100 pile of parts...
- Alstoyz
- Preferred User

- Posts: 289
- Joined: Thu Aug 16, 2012 10:43 pm
- Location: Gainesville, Tx
Re: Project "Uncle Fester"- 6/2 Headliner and more
Looking very nice!!! 
1970 F-100 SWB Tubbed
1971 F-350 4X4 (traded for 71 crewcab)
1971 F-250 Crew-Cab Dually
1972 F-100 SWB 4X4
1972 F-350 Crew-Cab 4X4 Dually
2001 F-350 Crew-Cab Short Bed 4X4 Dually
1971 F-350 4X4 (traded for 71 crewcab)
1971 F-250 Crew-Cab Dually
1972 F-100 SWB 4X4
1972 F-350 Crew-Cab 4X4 Dually
2001 F-350 Crew-Cab Short Bed 4X4 Dually
- 72stepside
- Blue Oval Fan

- Posts: 537
- Joined: Tue May 09, 2006 10:31 pm
- Location: Florida, Milton
- Contact:
Re: Project "Uncle Fester"- 6/2 Headliner and more
Absolutely. Lowes and Home Depot both.Coupe5oh wrote:That looks great. I've been debating on what to use for my headliner, is the board something Lowes would carry?
Chris
72 F100 Stepside w/ 78 300 CID
Hedman Headers
Disc Brakes
Power Steering with 3 STILL on the tree
Comfy Crown Vic Seats
71 F250 PS, PB, AC, Auto, 390
Loooong way to go on this one!


72 F100 Stepside w/ 78 300 CID
Hedman Headers
Disc Brakes
Power Steering with 3 STILL on the tree
Comfy Crown Vic Seats
71 F250 PS, PB, AC, Auto, 390
Loooong way to go on this one!


- Heirloom
- Blue Oval Fan

- Posts: 549
- Joined: Fri Feb 08, 2013 2:33 pm
- Location: Paradise
Re: Project "Uncle Fester"- 6/2 Headliner and more
Great job! 

~Heirloom
'68 F250 360, 4 spd Project Thread!
Plans are for a stout 400, C6, 3.54 gears, 33" BFG AT's, bucket seats and custom console. Final assembly, nearing start up...
"Those who hammer their guns into plows will plow for those who do not."
~ Thomas Jefferson
"America will never be destroyed from the outside. If we falter and lose our freedoms, it will be because we destroyed ourselves."
~ Abraham Lincoln
- 72stepside
- Blue Oval Fan

- Posts: 537
- Joined: Tue May 09, 2006 10:31 pm
- Location: Florida, Milton
- Contact:
Re: Project "Uncle Fester"- 8/3 Seat and Bumper
Not much to report. It has been HOT and humid here so I haven't wanted to do anything to the truck. Past couple of weeks I've been fighting a carb vacuum leak due to an incorrect gasket then it was a fuel issue due to another faulty gasket. Seems we've got those issues handled. It sure runs better when it's getting the right fuel/air mixture.
I've spent a lot of time getting my shop and pole barn squared away. Got some shelves built to store parts and got my (seemingly) endless supply of scrap lumber purged and organized.
Before installing the seat, I got the re-built heater box installed. I knew I didn't want to fight that seat while wrestling the heater into place.
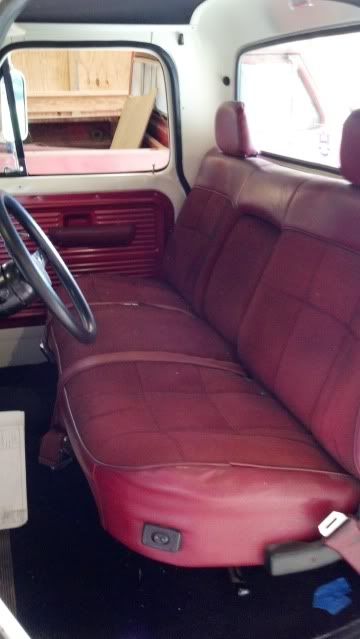
In the spirit of cleanup, I FINALLY installed the seat in the truck. This was one of my junkyard finds from a mid 90's F-150. If you remember, I mentioned a few years ago (I'm ashamed that it took so long) the fact that the seat is red ended up setting the color scheme for the truck. Anyway, finally installed complete with some good, red stock seat belts I got a while back !!!
There was a question as to whether or not the lower body trim would fit between the body and the rear bumper. I remember the trim that came off the truck was severely mangled from impact with the bumper. Fortunately I found a good set out of the scrap yard a couple of years ago. A while back, I set the bumper on blocks just to see how it would fit and it didn't look promising... it looked like the ends of the bumper might have to be trimmed for a good fit. Today, we installed the brackets to the bumper, hung the bumper to the frame with one bolt, them flipped it up and put in the other bolt. This was a good method cause everything was under control and nothing got scratched up. Once installed, I had to hunt the trim pieces... after a panic, I finally found them all.
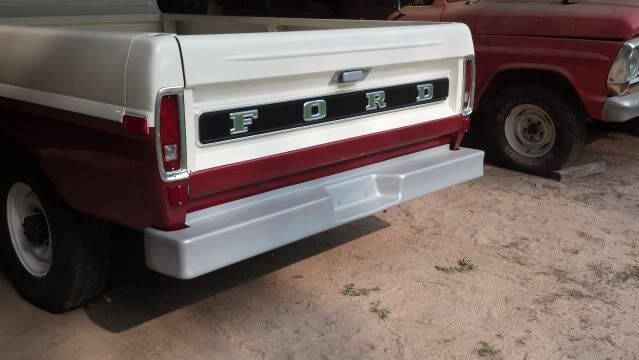
So once installed, it looks like the trim will fit in there nicely. Here's the bumper hung on the truck, and most importantly, IT IS OUT OF MY WAY!!!! It is painted with silver paint my Father has used on tractor rims... quite durable.
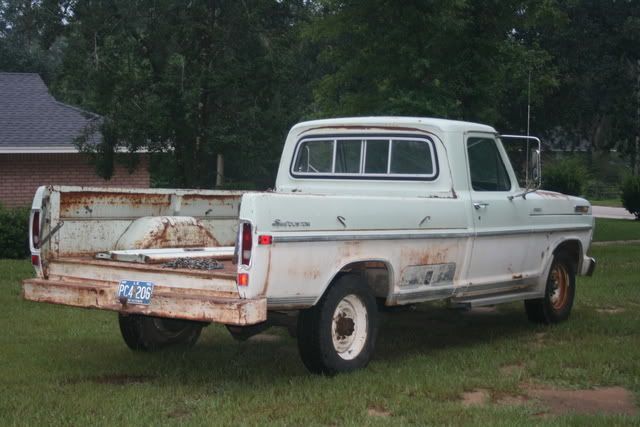
Before:
After:
I've spent a lot of time getting my shop and pole barn squared away. Got some shelves built to store parts and got my (seemingly) endless supply of scrap lumber purged and organized.
Before installing the seat, I got the re-built heater box installed. I knew I didn't want to fight that seat while wrestling the heater into place.
In the spirit of cleanup, I FINALLY installed the seat in the truck. This was one of my junkyard finds from a mid 90's F-150. If you remember, I mentioned a few years ago (I'm ashamed that it took so long) the fact that the seat is red ended up setting the color scheme for the truck. Anyway, finally installed complete with some good, red stock seat belts I got a while back !!!

There was a question as to whether or not the lower body trim would fit between the body and the rear bumper. I remember the trim that came off the truck was severely mangled from impact with the bumper. Fortunately I found a good set out of the scrap yard a couple of years ago. A while back, I set the bumper on blocks just to see how it would fit and it didn't look promising... it looked like the ends of the bumper might have to be trimmed for a good fit. Today, we installed the brackets to the bumper, hung the bumper to the frame with one bolt, them flipped it up and put in the other bolt. This was a good method cause everything was under control and nothing got scratched up. Once installed, I had to hunt the trim pieces... after a panic, I finally found them all.
So once installed, it looks like the trim will fit in there nicely. Here's the bumper hung on the truck, and most importantly, IT IS OUT OF MY WAY!!!! It is painted with silver paint my Father has used on tractor rims... quite durable.
Before:

After:

Chris
72 F100 Stepside w/ 78 300 CID
Hedman Headers
Disc Brakes
Power Steering with 3 STILL on the tree
Comfy Crown Vic Seats
71 F250 PS, PB, AC, Auto, 390
Loooong way to go on this one!


72 F100 Stepside w/ 78 300 CID
Hedman Headers
Disc Brakes
Power Steering with 3 STILL on the tree
Comfy Crown Vic Seats
71 F250 PS, PB, AC, Auto, 390
Loooong way to go on this one!


- 72stepside
- Blue Oval Fan

- Posts: 537
- Joined: Tue May 09, 2006 10:31 pm
- Location: Florida, Milton
- Contact:
Re: Project "Uncle Fester"- 9/21 Interior almost finished
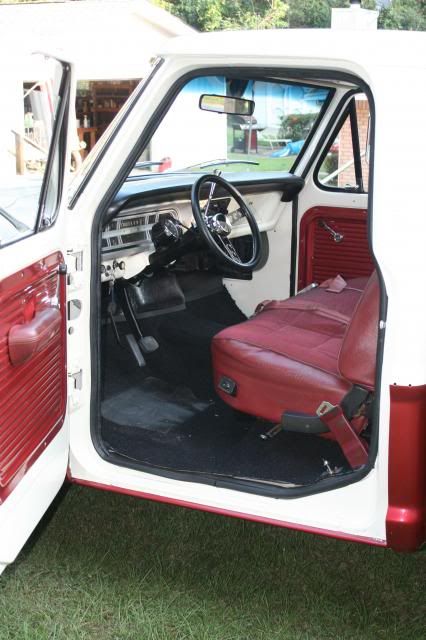
It's been about a month and a half since I posted. Since then I've finished the interior except for scuff plates at the door openings and the AC unit (coming later). I got some insurance and a temp tag so I've had it out on the road a few times.
Here you see the interior:
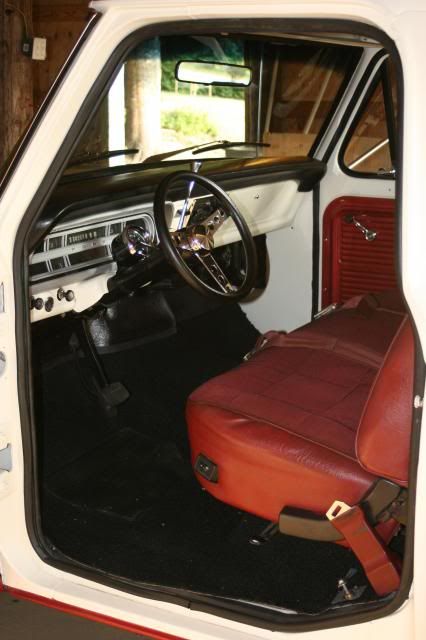
I had a heck of a time with the instrument cluster. I could not get it to work at all. I found out I was trying to plug it in upside down. Also the speedometer jumped around all over the place. I lubed the speedo cable with some dry lubricant to solve that problem. I think I had it in and out 4 times!
There are two, what I call, THANK YOU bolts that hold the bottom of the dash to the steering column tunnel. Those are so hard to get to. I think I spent an hour on them. Finally gottem!
I got a shaft style radio off of eBay... a JVC ks-rx147. I have that unit in my F100. It has plenty of power, fits nicely, and has really good reception. I was trying to figure out how to replicate an in-dash speaker. I took the single speaker bracket and fit it to two Sony speakers that I had laying around that had never been installed.
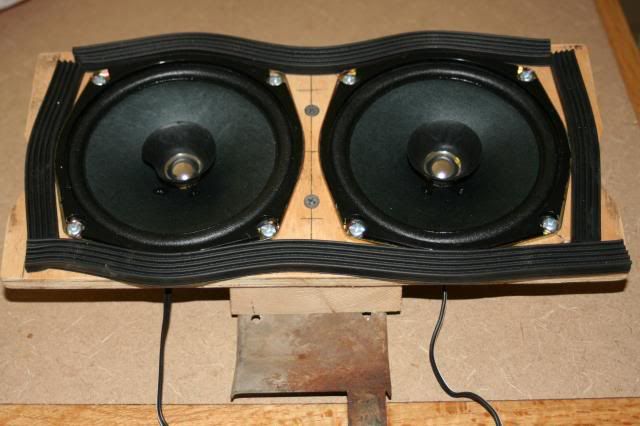
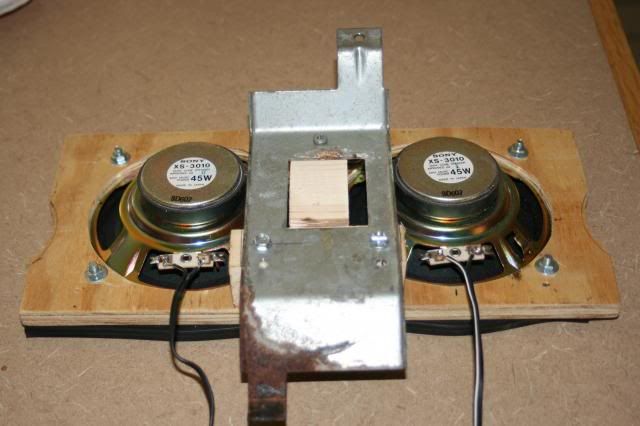
I used the left over weather stripping from my side tool box door to create a pad between the speakers and the underside of the dash. They sounded much better than I expected. What I was after was to make sure I could at least get a little sound from the front.
Next up was the rear speaker. I bought some indoor/outdoor speakers off of mcmelectronics.com (great website for audio/video equipment and especially cables). I originally intended to place them behind the seats in the corner space between my filler panel and the doors. They were too big. I couldn't find anywhere else to put them so I settled for under the front of the seat. I got some stainless drill point screws and fastened them to the store. They sound really good. I have the fade set just right to get good sound out of them and my in-dash speakers.
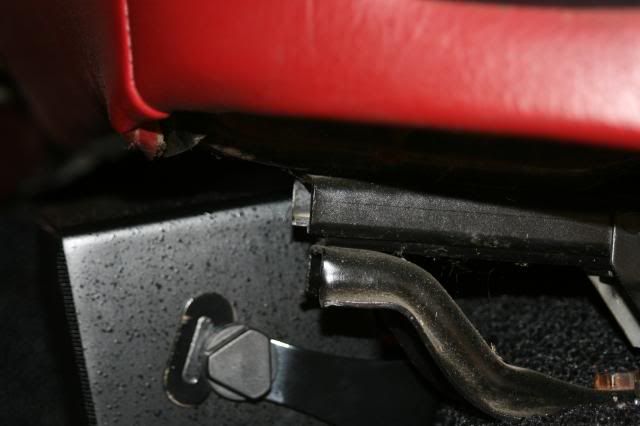
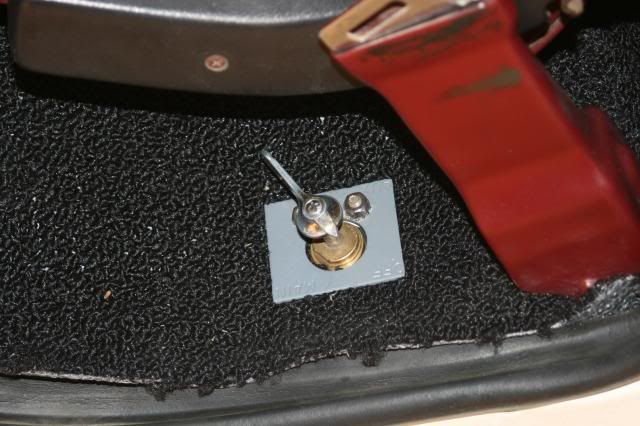
I got my fuel supply switch installed. I had cleaned it up several months ago. I wanted to leave the hole in the floor and re-install it because I thought it was a unique feature to the truck. I used rubber O-rings and black silicone to seal it up against the underside of the cab.
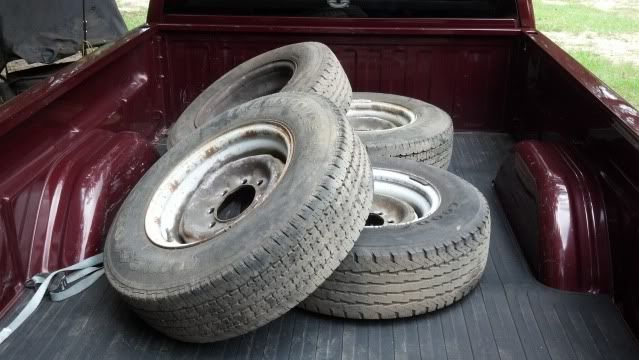
On my wife's birthday, I went to the junkyard and got some wheels and tires. I decided to go with some used tires for now due to funding. We got 4 good tires off of two different E-250 vans for $107.50. I picked the four that had the least amounts of weights on them. Got them all cleaned up and painted with some bright white glossy implement paint. I finally got to put my F250 hubcaps on that I've had for a long time. I found the best way to put on the hubcaps is to just lean on them really hard until they snap on. I couldn't get them to budge with a rubber mallet.
Before:
After:
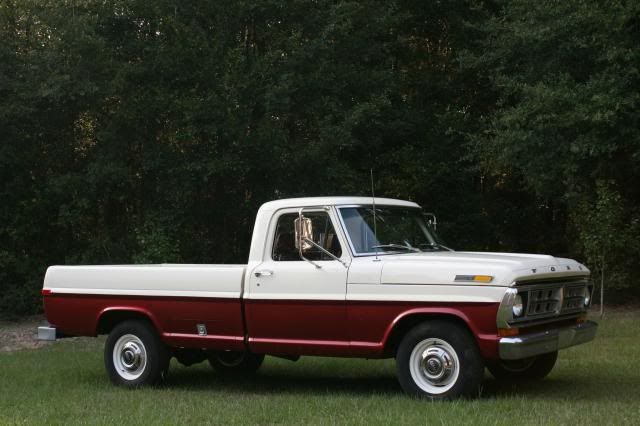
The other day I got the truck out and took a few pictures:
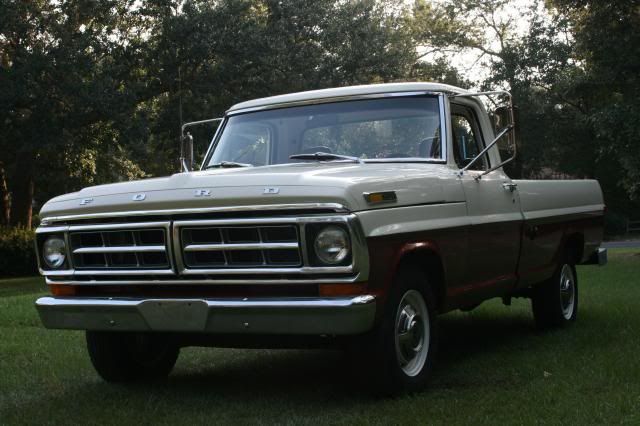
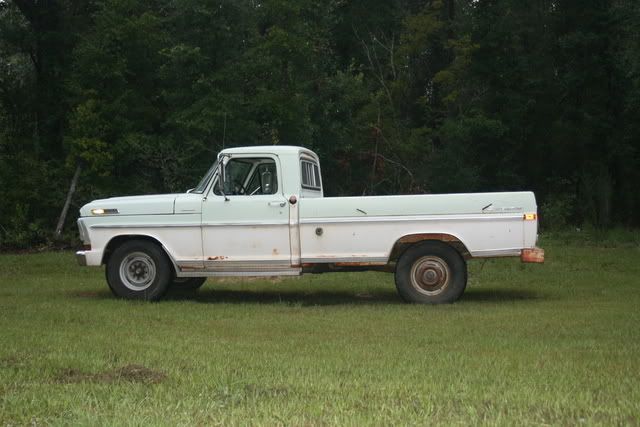
Here's a before and after pic, 7 years apart:
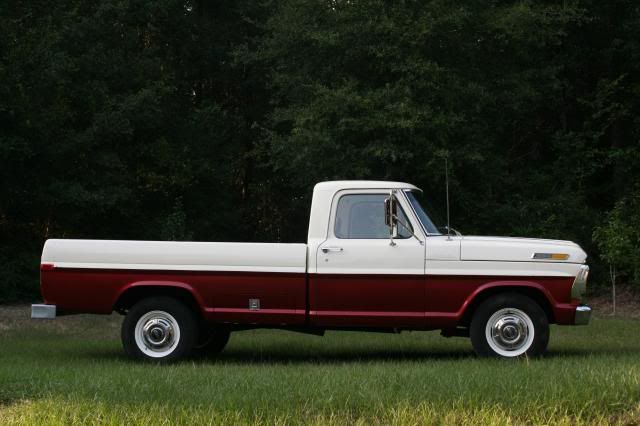
Since I've had it out on the road, I've found a few rattles and vibrations that need attention, but nothing major that will require wholesale changes. I still have to buy up all of my exterior trim clips in order to install all of the trim and get a real exhaust system installed.
Still have a ways to go but it is coming together. Stay tuned.
Here you see the interior:

I had a heck of a time with the instrument cluster. I could not get it to work at all. I found out I was trying to plug it in upside down.
There are two, what I call, THANK YOU bolts that hold the bottom of the dash to the steering column tunnel. Those are so hard to get to. I think I spent an hour on them. Finally gottem!
I got a shaft style radio off of eBay... a JVC ks-rx147. I have that unit in my F100. It has plenty of power, fits nicely, and has really good reception. I was trying to figure out how to replicate an in-dash speaker. I took the single speaker bracket and fit it to two Sony speakers that I had laying around that had never been installed.


I used the left over weather stripping from my side tool box door to create a pad between the speakers and the underside of the dash. They sounded much better than I expected. What I was after was to make sure I could at least get a little sound from the front.
Next up was the rear speaker. I bought some indoor/outdoor speakers off of mcmelectronics.com (great website for audio/video equipment and especially cables). I originally intended to place them behind the seats in the corner space between my filler panel and the doors. They were too big. I couldn't find anywhere else to put them so I settled for under the front of the seat. I got some stainless drill point screws and fastened them to the store. They sound really good. I have the fade set just right to get good sound out of them and my in-dash speakers.

I got my fuel supply switch installed. I had cleaned it up several months ago. I wanted to leave the hole in the floor and re-install it because I thought it was a unique feature to the truck. I used rubber O-rings and black silicone to seal it up against the underside of the cab.

On my wife's birthday, I went to the junkyard and got some wheels and tires. I decided to go with some used tires for now due to funding. We got 4 good tires off of two different E-250 vans for $107.50. I picked the four that had the least amounts of weights on them. Got them all cleaned up and painted with some bright white glossy implement paint. I finally got to put my F250 hubcaps on that I've had for a long time. I found the best way to put on the hubcaps is to just lean on them really hard until they snap on. I couldn't get them to budge with a rubber mallet.
Before:

After:

The other day I got the truck out and took a few pictures:


Here's a before and after pic, 7 years apart:


Since I've had it out on the road, I've found a few rattles and vibrations that need attention, but nothing major that will require wholesale changes. I still have to buy up all of my exterior trim clips in order to install all of the trim and get a real exhaust system installed.
Still have a ways to go but it is coming together. Stay tuned.
Chris
72 F100 Stepside w/ 78 300 CID
Hedman Headers
Disc Brakes
Power Steering with 3 STILL on the tree
Comfy Crown Vic Seats
71 F250 PS, PB, AC, Auto, 390
Loooong way to go on this one!


72 F100 Stepside w/ 78 300 CID
Hedman Headers
Disc Brakes
Power Steering with 3 STILL on the tree
Comfy Crown Vic Seats
71 F250 PS, PB, AC, Auto, 390
Loooong way to go on this one!


- sargentrs
- 100% FORDified!

- Posts: 9866
- Joined: Fri Jun 22, 2007 9:30 am
- Location: Georgia, Jasper
Re: Project "Uncle Fester"- 9/21 Interior almost finished
Wow! She looks great!
Randy
1970 F100 Sport Custom Limited LWB, 302cid, 3 on the tree. NO A/C, NO P/S, NO P/B. Currently in 1000 pcs while rebuilding. Project thread: http://www.fordification.com/forum/view ... 22&t=59995 Plan: 351w, C4, LSD, pwr front disc, p/s, a/c, bucket seats, new interior and paint.
1987 F-150 XLT Lariat, 5.0/C6 auto.
- tbone6
- Preferred User

- Posts: 373
- Joined: Mon Oct 08, 2012 2:16 pm
- Location: Jacksonville/Madison, Florida
Re: Project "Uncle Fester"- 9/21 Interior almost finished
Excellent job, thanks for sharing! 
t6
1972 F100
1972 F100
- F100builder
- Blue Oval Guru

- Posts: 1304
- Joined: Thu Jan 10, 2008 6:55 pm
- Location: Idaho, Nampa
Re: Project "Uncle Fester"- 9/21 Interior almost finished
AWESOME!!! 
Patrick


'56 F100; Must.II IFS, 351W bored & stroked to 395c.i. 470hp/483ft-lbs., AOD, 4-link coilover 9" w/ 3.89's
'69 F100; 390, C6, Dana 60 w/ 4.10's
'70 F100; 'new' and latest project soon to have a built 390/C6 and 3.50 gears
To see more of my F100's: http://www.cardomain.com/id/lowfat56


'56 F100; Must.II IFS, 351W bored & stroked to 395c.i. 470hp/483ft-lbs., AOD, 4-link coilover 9" w/ 3.89's
'69 F100; 390, C6, Dana 60 w/ 4.10's
'70 F100; 'new' and latest project soon to have a built 390/C6 and 3.50 gears
To see more of my F100's: http://www.cardomain.com/id/lowfat56