Project "I Must Be Nuts" - On the road!

Post progress reports on your project truck(s)

Moderator: FORDification

User avatar
71PA_Highboy
Blue Oval Fanatic
Blue Oval Fanatic
Posts: 923
Joined: Tue May 23, 2006 11:32 am
Location: Denver of the East

Re: Project "I Must Be Nuts" - somewhere in the middle

Post by 71PA_Highboy »

71PA_Highboy wrote:Frame was $240, haven't received the bill yet.. :pray:
Sooo...

Frame & inner fenders = $240

Just got a call on the rest:

Cab, 4 doors, 4 fenders, hood, door hinge(x8), axle brackets and Bed = $1350

They want me to stop in and QA the bed on Monday...

I still think that is a pretty good price....

All that was with pickup and delivery (3 trips ~ 25 miles). I will get it delivered next week.... So the cab painting needs to be done this weekend....
Got Ford?
2 EarlyBroncos (68,69)
2 Classic Mustangs (69,70)
1 F250 4x4 (71) - OB - 360, NP435, D24, HPD60 4.10, D60,
1 94 Ranger, 2.3, 5spd
1 Lincoln Mark VIII
User avatar
Manny
Blue Oval Guru
Blue Oval Guru
Posts: 1190
Joined: Wed Oct 04, 2006 7:15 pm
Location: Georgia, Lake City
Contact:

Re: Project "I Must Be Nuts" - somewhere in the middle

Post by Manny »

Not bad for no mess for your to deal with at the house!!!
Just another Ford fool named Dan.
The Junk that hangs around
67' F-250 highboy Camper special cross breed currently under way
http://www.fordification.com/forum/view ... 22&t=86706
1974 Bronco 302 3 speed
1984 bronco 302 c6 35's
1994 F350 7.3 5spd dually.
woods wrote: The rust holes in my truck were a factory install (very rare).
whiteblur
New Member
New Member
Posts: 189
Joined: Sun Mar 13, 2011 7:26 pm

Re: Project "I Must Be Nuts" - somewhere in the middle

Post by whiteblur »

Just got my rolling chassis blasted and painted :D Getting it back Saturday, the guy sent me pictures of it and im UBBER excited :woohoo:
User avatar
71PA_Highboy
Blue Oval Fanatic
Blue Oval Fanatic
Posts: 923
Joined: Tue May 23, 2006 11:32 am
Location: Denver of the East

Re: Project "I Must Be Nuts" - somewhere in the middle

Post by 71PA_Highboy »

It has been a month and it seems like the time has just disappeard with VERY little to show for it... No pics in this post, but I will try to get some up today or tomorrow before I am gone again :(

I have come to some realizations - as a former restoration expert, my usual builds are slow and methodical, but when I am done they are perfect. I have never tried to work any other way, but I MUST do this one differently. Due to time constraints, I have to focus on getting the assembled and running by June 30 as I have to move. So you will see me focusing on those things that can't be done in a small garage in an HOA regulated community. Some examples are I have an NP205 I wanted to install, but instead will slap the working D24 back in - ugly, greasy and all, as I can rebuild the 205 and install it easily in a small garage. I can't do the body and paint... so that has to be done right. Same goes for the NP435... sadly, but it worked OK before, so I will just reseal it.

I say all that so when you see me bolting up a greasy piece of crap to this you don't think I am lazy or crazy... ; OK.. Maybe crazy... :wink:
Here is what has happened since the last update:

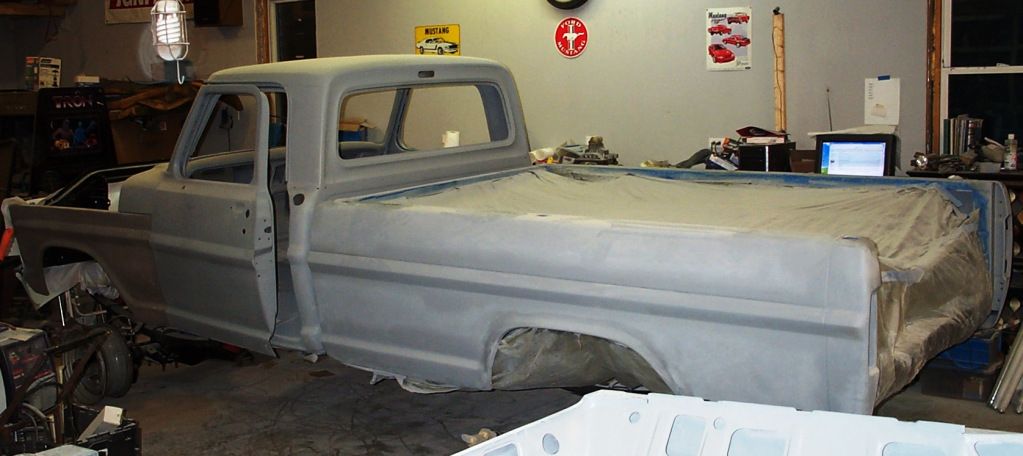
Cab is primed and the underside/firewall is in it's final semi-gloss Black (Hirsch's Chassis Black - same as the Frame)

Most of the small parts have been blasted/primed/painted and are waiting for reassembly.

Seat frame is blasted/primed/painted.

Front fenders are primed and bodywork done.

Inner Fenders are finished - same semi-gloss black.

Frame is back on the horizontal, putting axles under it. Since I am installing 79 D60's there is a lot of work to make them fit - especially as I am using some custom front springs - modified superduty springs. They were designed and sold by Cage offroad... I know the manager there and got a set before they closed and they have just been sitting around. You have to modify the front mount to use the 18MM bolt, but otherwise they fit great.

Took the 3 spare steering boxes I had and built 1.... hopefully it will steer well... if not I can put the original back in... as sloppy as it was.

Hung the transfer case... New bushings to keep it tight.

Took the rear driveshaft in and had it reworked and balanced.

Ordered $1000 worth of weather stripping from Dennis Carpenter... it may be pricey, but the best if you can't get Ford WS...

Anyway, that is about all I can remember... I will get pics up later.
Got Ford?
2 EarlyBroncos (68,69)
2 Classic Mustangs (69,70)
1 F250 4x4 (71) - OB - 360, NP435, D24, HPD60 4.10, D60,
1 94 Ranger, 2.3, 5spd
1 Lincoln Mark VIII
User avatar
averagef250
100% FORDified!
100% FORDified!
Posts: 4387
Joined: Fri Mar 17, 2006 12:58 am
Location: Oregon, Beavercreek

Re: Project "I Must Be Nuts" - somewhere in the middle

Post by averagef250 »

You can just put a bushing in the superduty spring eyes and install them.
1970 F-250 4x4 original Willock swivel frame chassis '93 5.9 Cummins/Getrag/NP205/HP60/D70
User avatar
71PA_Highboy
Blue Oval Fanatic
Blue Oval Fanatic
Posts: 923
Joined: Tue May 23, 2006 11:32 am
Location: Denver of the East

Re: Project "I Must Be Nuts" - somewhere in the middle

Post by 71PA_Highboy »

So it has been a while...

Went to install the 79 rear D60 - Had to relocate the spring mounts - and the ones I had were 2.5" wide, so I ended up 'grooving' them to make them fit the bolts that hold the springs and axle together.

Then I went to install the shocks, and had to relocate the lower shock mount to match the frame... and the shocks I bought were too long... and the rear swaybar mount was in the way - Cut off the sway bar mount, determined the right length of shock and welded the shock mounts on.

The front D60 has also been a chore - with the Poly issues (see poly in the 4x4 section) resolved for the rear, I went back to making sure the front is installed correctly and safely. When I went to tighten the U-Bolts, one galled and froze about 1/4" from being tight... so I got to cut it off and get another made... only $17... but at that rate I will be broke before I tighten anything up...

Went to work on the doors... and once all the body filler was gone, the rust exposed, it turns out they all need work... a little welding, shrinking and stretching and I should be OK...

Since I am waiting for someone smarter than me to help finish the doors, I went to install the electric antenna.. Finally something went together well and as expected (http://www.fordification.com/forum/view ... 77#p598677).

Spent some time moving my other spares (bronco/mustang/lincoln) to Ohio, so that cleared out some space here and it is making it easier to work... not a lot easier, but it has allowed me to set the finished parts aside and organize them.

That is about it... the next challenge will be the new wiring harness... Originally purchased for one of the Broncos, but it is going in this beast instead.


Hope your builds are going better.
Got Ford?
2 EarlyBroncos (68,69)
2 Classic Mustangs (69,70)
1 F250 4x4 (71) - OB - 360, NP435, D24, HPD60 4.10, D60,
1 94 Ranger, 2.3, 5spd
1 Lincoln Mark VIII
User avatar
71PA_Highboy
Blue Oval Fanatic
Blue Oval Fanatic
Posts: 923
Joined: Tue May 23, 2006 11:32 am
Location: Denver of the East

Re: Project "I Must Be Nuts" - somewhere in the middle

Post by 71PA_Highboy »

Cab is back on the frame, we'll see how the poly bushing flail-ex goes...

Brake lines are done.

Rear axle is completely in, front is 90%... the 18mm bolts are becoming a PITA... trying to find an 18mm bolt with 110mm shoulder seems to be more of a challenge than I expected.

Waiting on hinge pins for finish the hinges off... Still need to figure out a body color... :(

Going to start on a new wiring harness tomorrow, so we will see how that goes.. I will do a review when i get it finished...
Got Ford?
2 EarlyBroncos (68,69)
2 Classic Mustangs (69,70)
1 F250 4x4 (71) - OB - 360, NP435, D24, HPD60 4.10, D60,
1 94 Ranger, 2.3, 5spd
1 Lincoln Mark VIII
User avatar
averagef250
100% FORDified!
100% FORDified!
Posts: 4387
Joined: Fri Mar 17, 2006 12:58 am
Location: Oregon, Beavercreek

Re: Project "I Must Be Nuts" - somewhere in the middle

Post by averagef250 »

71PA_Highboy wrote: the 18mm bolts are becoming a PITA... trying to find an 18mm bolt with 110mm shoulder seems to be more of a challenge than I expected.
Rolled Metric fasteners usually have a 40 or 50 MM threaded portion. If you need a bolt with a specific thread length you need to go to the source-

Qualitychasers.com

These guys make the geometric die chasers for the shops that make custom bolts. Ask them who they've sold the diameter and pitch chasers to for the bolt size you need and call that shop to see what a couple bolts with 110MM shoulder will cost. I'd guess around $40 for a pair. You need a few thousand qty before the pricing gets good.

I make a product that uses special length metric bolts. I buy bolts 50MM longer than I need, shorten and thread them for my application. This is actually very common in industry. Bolts are not hard, they are worked cold.

The much better solution (as I mentioned before) is to machine a solid sleeve for the spring eye with a .563 bore. 5 minutes with a lathe and your set.
1970 F-250 4x4 original Willock swivel frame chassis '93 5.9 Cummins/Getrag/NP205/HP60/D70
User avatar
71PA_Highboy
Blue Oval Fanatic
Blue Oval Fanatic
Posts: 923
Joined: Tue May 23, 2006 11:32 am
Location: Denver of the East

Re: Project "I Must Be Nuts" - somewhere in the middle

Post by 71PA_Highboy »

I am not sure how you expect that to happen... .563 is 14.3MM, and the bore of the eye bushing in the spring eye is 18mm. That means a sleeve of ~2mm (.078") I can barely spell lathe, let alone make a quality fit sleeve of that dimension... if you can make a sleeve that fits, send me a price for 2...
Got Ford?
2 EarlyBroncos (68,69)
2 Classic Mustangs (69,70)
1 F250 4x4 (71) - OB - 360, NP435, D24, HPD60 4.10, D60,
1 94 Ranger, 2.3, 5spd
1 Lincoln Mark VIII
User avatar
averagef250
100% FORDified!
100% FORDified!
Posts: 4387
Joined: Fri Mar 17, 2006 12:58 am
Location: Oregon, Beavercreek

Re: Project "I Must Be Nuts" - somewhere in the middle

Post by averagef250 »

9/16 is .5625. Your standard 9/16 rolled thread bolt has a major diameter around .555 so it will slip right through a .5625 hole.

A steel bushing that is 18MM OD and 9/16 ID solves all your problems. There's no need for an 18MM bolt.

I have some superduty springs here to measure off of, but would like to go over the details before making them. PM sent.
1970 F-250 4x4 original Willock swivel frame chassis '93 5.9 Cummins/Getrag/NP205/HP60/D70
User avatar
71PA_Highboy
Blue Oval Fanatic
Blue Oval Fanatic
Posts: 923
Joined: Tue May 23, 2006 11:32 am
Location: Denver of the East

Re: Project "I Must Be Nuts" - Approaching the end

Post by 71PA_Highboy »

Well,

I guess I should update this thread. The deadline is RAPIDLY approaching, but I am still on it.

3 June 2012.... almost there
Image


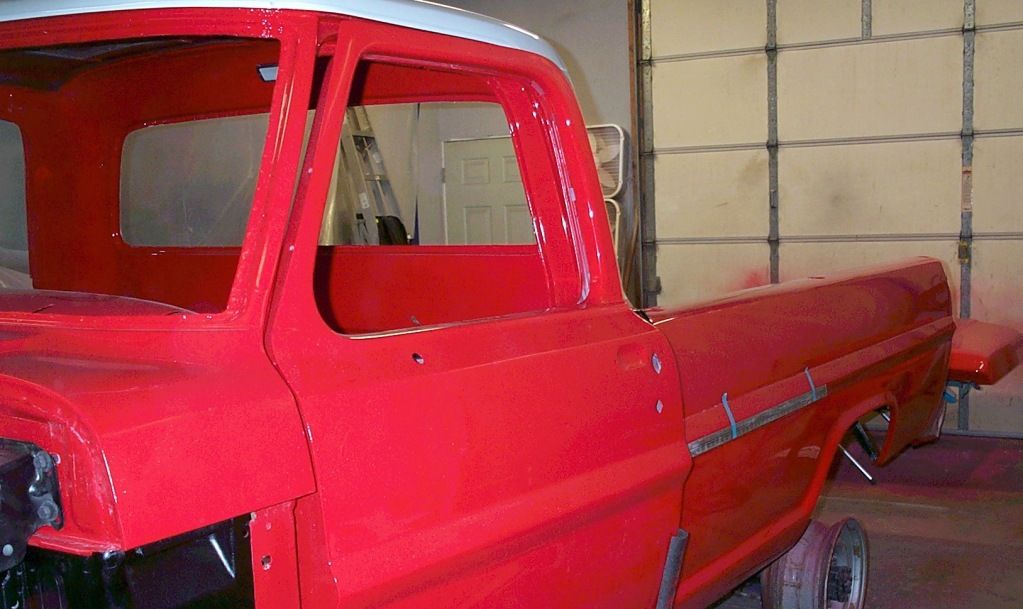
Today:
Image
The yardstick was to align the body lines so I could get everything straight.

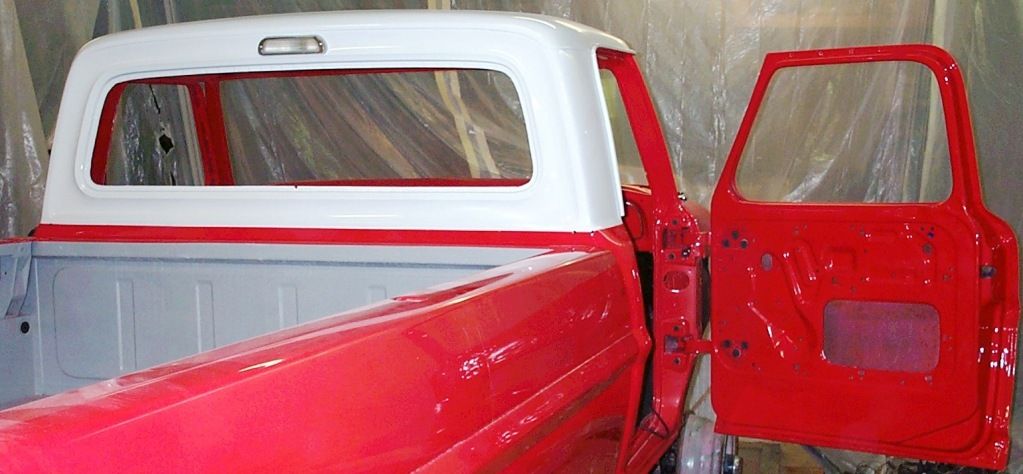
Image
Red, White and Gray..... Since I am going to Rhino the bed, I figured there was no reason to waste $$$ and paint...

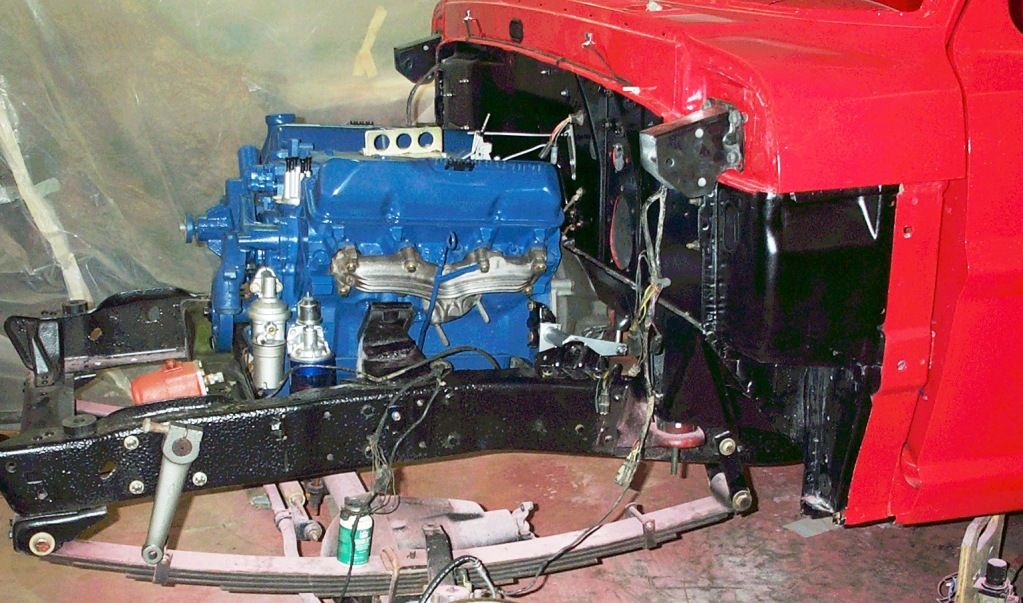
Engine and drivetrain are mostly in:
Image

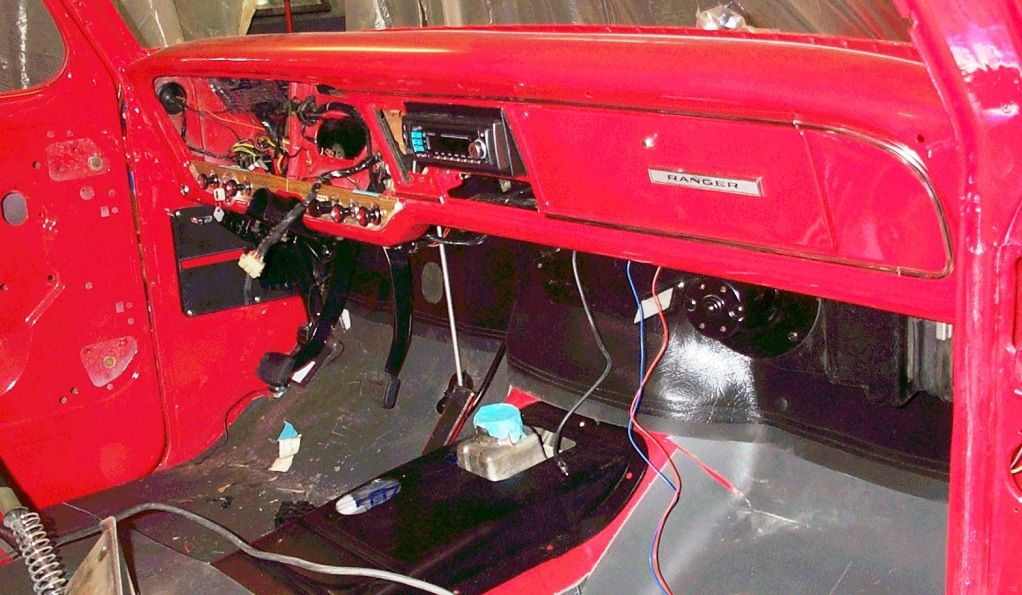
Finally - Interior progress... Note the F600 dash connector ... ;)
Image
Last edited by 71PA_Highboy on Mon Jul 16, 2012 12:15 pm, edited 1 time in total.
Got Ford?
2 EarlyBroncos (68,69)
2 Classic Mustangs (69,70)
1 F250 4x4 (71) - OB - 360, NP435, D24, HPD60 4.10, D60,
1 94 Ranger, 2.3, 5spd
1 Lincoln Mark VIII
XXXWEBERXXX
New Member
New Member
Posts: 31
Joined: Mon Nov 21, 2011 1:40 pm

Re: Project "I Must Be Nuts" - somewhere in the middle

Post by XXXWEBERXXX »

Very nice! I love the white/red!
User avatar
71PA_Highboy
Blue Oval Fanatic
Blue Oval Fanatic
Posts: 923
Joined: Tue May 23, 2006 11:32 am
Location: Denver of the East

Re: Project "I Must Be Nuts" - Nearing the end

Post by 71PA_Highboy »

Lessons learned:

Install springs on upper hinges BEFORE installing hinges into the door post.
Install clutch pedal assist spring BEFORE putting the pedal support into the vehicle.
Micro-inspect the wiring harness before installing the harness into the vehicle.
Ensure you have a plan for re-assembly and stick to it.... don't ADHD it.... (look, a squirrel)

Paint everything a week before you need it. You will invariably find something you didn't know needed painting and will be prepped and not waiting for paint to dry. And when the paint goes wrong (color, dirt, runs) you have time to fix it before you need it...

The parts you need to install today should have been purchased last week. You will still run to the store for stuff, but it won't be as bad.

Ask questions here... lots of them - AFTER you have searched the forums. Unlike others, I think there are dumb questions, and yes I am guilty of asking some of them.

Read Robroy's threads on whatever you are doing. You may not agree with what he does, but at least you will have read a presentation that is well thoughtout and documented. Now read it again and take notes - focus on what he admits to doing wrong/making bad choices. Most of the 'wrong things' are reasonable and understandable, so it MAY prevent you from making the same mistake.

Finally, in those moments of dispair, take a break... even an hour helps, to recenter and refocus.

I am not sure I am done with those moments yet though.... ;)
Last edited by 71PA_Highboy on Wed Jul 18, 2012 8:52 am, edited 1 time in total.
Got Ford?
2 EarlyBroncos (68,69)
2 Classic Mustangs (69,70)
1 F250 4x4 (71) - OB - 360, NP435, D24, HPD60 4.10, D60,
1 94 Ranger, 2.3, 5spd
1 Lincoln Mark VIII
smokey3215
New Member
New Member
Posts: 138
Joined: Wed Apr 20, 2011 9:12 pm

Re: Project "I Must Be Nuts" - Nearing the end

Post by smokey3215 »

Wow the truck is looking awesome.hopefully it will still be there when I come up at the end of the month.
User avatar
guerra
Blue Oval Fan
Blue Oval Fan
Posts: 700
Joined: Wed Mar 10, 2010 4:29 pm
Location: West Texas

Re: Project "I Must Be Nuts" - Nearing the end

Post by guerra »

That looks real good!! :thup: What color red is that?
1967 f-100 lwb 360/c6
1969 f-100 swb 351/c6 (project)
Post Reply