this weekend i will be pretty far ahead though, i should have EVERYTHING in por-15 by monday
Project "Uncle Fester"- 9/21 Interior almost finished
Moderator: FORDification
- 1971ford
- 100% FORDified!

- Posts: 5565
- Joined: Wed Jul 04, 2007 1:05 pm
- Location: Placerville CA
re: Project "Uncle Fester"-6/10 Just a quickie
dont make me eat too much more popcorn, i might explode
-Ryan
- 72stepside
- Blue Oval Fan

- Posts: 537
- Joined: Tue May 09, 2006 10:31 pm
- Location: Florida, Milton
- Contact:
Re: re: Project "Uncle Fester"-6/10 Just a quickie
I have done a little more. I was waiting for Sunday for an update but here goes...1971ford wrote:


dont make me eat too much more popcorn, i might explode
I got the hard brake lines off the rear end yesterday and got the rear drive shaft out. I plan to clean up the driveshaft Friday and POR-15 the rest of the rear frame and shaft on Saturday.
My father has got some things squared away at his place so he'll be able to help me soon with the welding the bed will require.
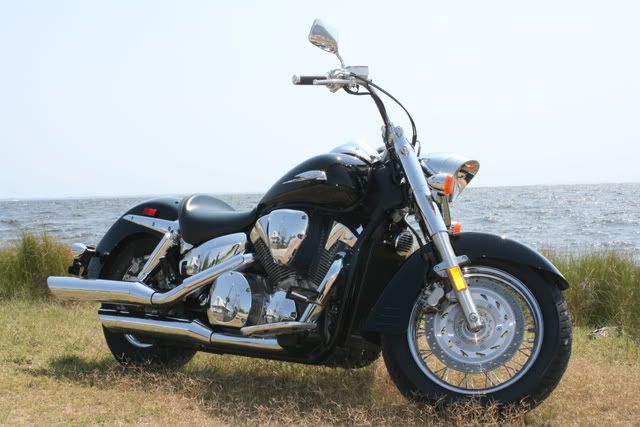
My motorcycle riding has gotten in the way of my truck lately...
Chris
72 F100 Stepside w/ 78 300 CID
Hedman Headers
Disc Brakes
Power Steering with 3 STILL on the tree
Comfy Crown Vic Seats
71 F250 PS, PB, AC, Auto, 390
Loooong way to go on this one!


72 F100 Stepside w/ 78 300 CID
Hedman Headers
Disc Brakes
Power Steering with 3 STILL on the tree
Comfy Crown Vic Seats
71 F250 PS, PB, AC, Auto, 390
Loooong way to go on this one!


- JWW
- Blue Oval Fanatic

- Posts: 793
- Joined: Wed Apr 11, 2007 7:57 pm
- Location: Tennessee
That is a sweet looking bike!
JWW
1967 F100 Ranger, Auto, 240ci
2004 F150 Crew Cab
My project: http://www.fordification.com/forum/view ... &sk=t&sd=a
1967 F100 Ranger, Auto, 240ci
2004 F150 Crew Cab
My project: http://www.fordification.com/forum/view ... &sk=t&sd=a
- 72stepside
- Blue Oval Fan

- Posts: 537
- Joined: Tue May 09, 2006 10:31 pm
- Location: Florida, Milton
- Contact:
re: Project "Uncle Fester"-6/25 Ok Ryan, here!
Ok, finally all done with the POR-15 on the rear third of the frame. It came out really nice. I got the rear section of the drive shaft cleaned up with a coat on it too. I used a real thin single coat cause I didn't want to take ANY chance on screwing with the balance of the shaft.
Nothing like applying POR-15 while wearing a long sleeved shirt in Florida in June on a 98 degree afternoon!!! I didn't want to get it on my arms, but one of my gloves sprung a leak so now I have a black thumb for the next 3 weeks.
I know, this thread is useless without pics. It has rained every day and night since I finished so you all will just have to wait.
Last edited by 72stepside on Fri Jul 04, 2008 7:39 pm, edited 1 time in total.
Chris
72 F100 Stepside w/ 78 300 CID
Hedman Headers
Disc Brakes
Power Steering with 3 STILL on the tree
Comfy Crown Vic Seats
71 F250 PS, PB, AC, Auto, 390
Loooong way to go on this one!


72 F100 Stepside w/ 78 300 CID
Hedman Headers
Disc Brakes
Power Steering with 3 STILL on the tree
Comfy Crown Vic Seats
71 F250 PS, PB, AC, Auto, 390
Loooong way to go on this one!


- 1971ford
- 100% FORDified!

- Posts: 5565
- Joined: Wed Jul 04, 2007 1:05 pm
- Location: Placerville CA
Re: re: Project "Uncle Fester"-6/25 Ok Ryan, here!
i dont believe in the por-15 sking staining myths
i got a BUNCH of por-15 on my legs and arms and hands, it all allready warn off after just a week.
keep the updates coming
-Ryan
- 72stepside
- Blue Oval Fan

- Posts: 537
- Joined: Tue May 09, 2006 10:31 pm
- Location: Florida, Milton
- Contact:
re: Project "Uncle Fester"-6/30 Put down the popco
Alright, finally some pictures...
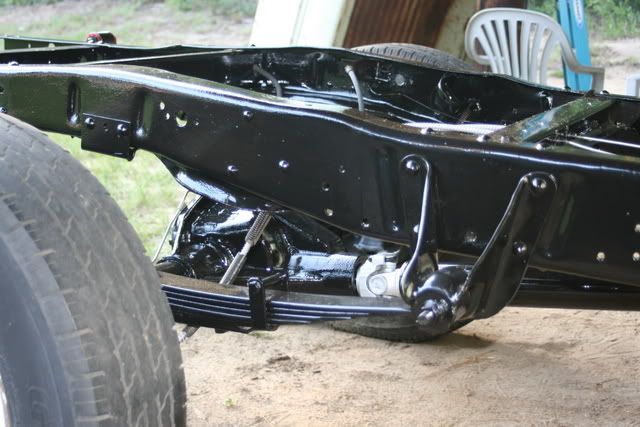
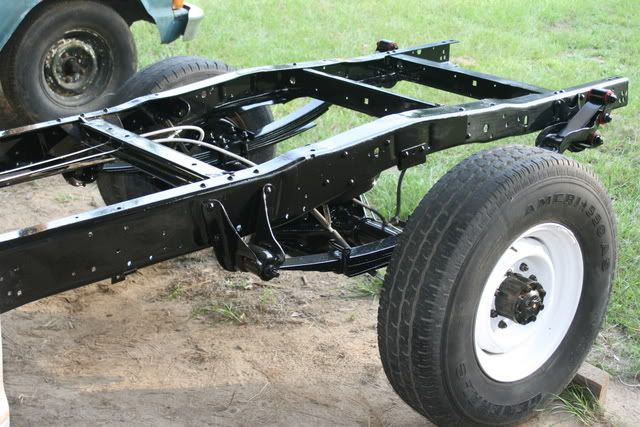
I got the rear portion of the truck encapsulated in POR-15... frame, rear end housing, springs, etc...
I got the emergency brake cables cleaned up, working, and painted. I just got that part buttoned up this afternoon.
Hopefully the pics came out ok...
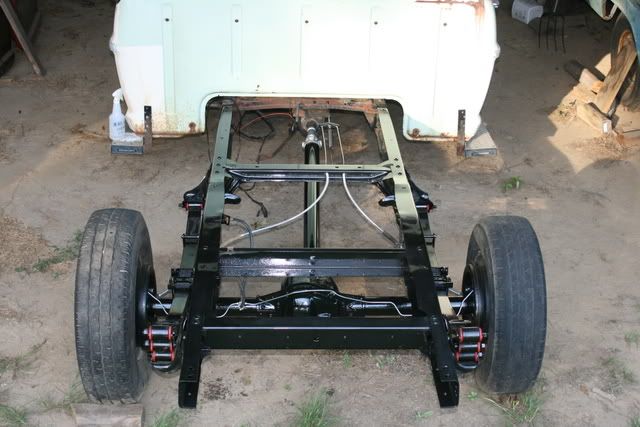
Now I need to get some shocks and get the rest of the attachements on the back (axle bumpers, wiring, exhaust hangers, etc)
Stay tuned (hopefully there'll be an update before October)
I got the rear portion of the truck encapsulated in POR-15... frame, rear end housing, springs, etc...
I got the emergency brake cables cleaned up, working, and painted. I just got that part buttoned up this afternoon.
Hopefully the pics came out ok...


Now I need to get some shocks and get the rest of the attachements on the back (axle bumpers, wiring, exhaust hangers, etc)
Stay tuned (hopefully there'll be an update before October)
Chris
72 F100 Stepside w/ 78 300 CID
Hedman Headers
Disc Brakes
Power Steering with 3 STILL on the tree
Comfy Crown Vic Seats
71 F250 PS, PB, AC, Auto, 390
Loooong way to go on this one!


72 F100 Stepside w/ 78 300 CID
Hedman Headers
Disc Brakes
Power Steering with 3 STILL on the tree
Comfy Crown Vic Seats
71 F250 PS, PB, AC, Auto, 390
Loooong way to go on this one!


- 72stepside
- Blue Oval Fan

- Posts: 537
- Joined: Tue May 09, 2006 10:31 pm
- Location: Florida, Milton
- Contact:
re: Project "Uncle Fester"-7/4 Update
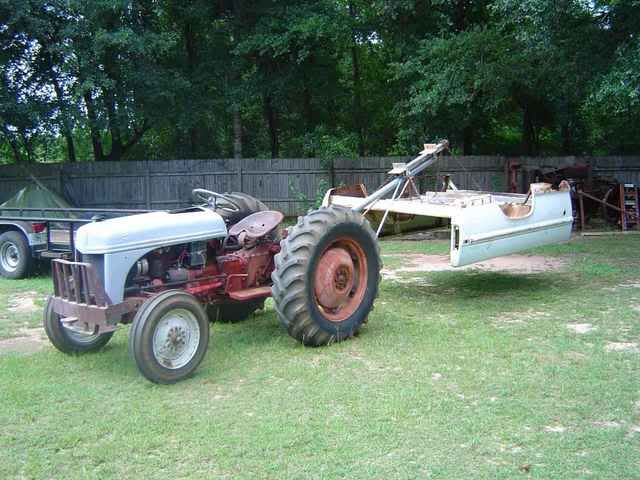
My father came over the other day to pick up my bed so we could get it to his house for the welding. Below is a picture of the method used to move it around at his house...
Below is the email text he sent me with the picture...
"Right after I took the picture, I backed it up to the shop and as I was lifting it up higher, the hydraulic safety valve in tractor gave out and it set down and wouldn't raise again. I had to re-rig for the F20. I got some of the bad metal out. It's really a nasty job."
I'll get some pictures of the lifting rig on the Farmall F-20 and provide an update on the condition of the 8N lift mechanism
Chris
72 F100 Stepside w/ 78 300 CID
Hedman Headers
Disc Brakes
Power Steering with 3 STILL on the tree
Comfy Crown Vic Seats
71 F250 PS, PB, AC, Auto, 390
Loooong way to go on this one!


72 F100 Stepside w/ 78 300 CID
Hedman Headers
Disc Brakes
Power Steering with 3 STILL on the tree
Comfy Crown Vic Seats
71 F250 PS, PB, AC, Auto, 390
Loooong way to go on this one!


- 1971ford
- 100% FORDified!

- Posts: 5565
- Joined: Wed Jul 04, 2007 1:05 pm
- Location: Placerville CA
Re: re: Project "Uncle Fester"-3/16 Bushing Pulle
yeahhhhh72stepside wrote: Word to those of you who are about to use POR-15. Heed the directions pertaining to placing some plastic wrap between the lid and can upon re-sealing. I was very careful and thought I hadn't dribbled any in the groove where the lid sits. WRONG !!!! There was a few little specks and that was enough for me to almost have to destroy the lid to get it off yesterday. I now have 2 ziplock bags with a paper towel between them and some large carpenters clamps (because the lid is deformed and won't seal now) to hold it all back together to keep out the air.
i have por-15 open in the garage right now and i cant seal it, i remembered you talked about this and you just solved my problem
ill use 2 ziplocks/towel and a clamp
-Ryan
- 72stepside
- Blue Oval Fan

- Posts: 537
- Joined: Tue May 09, 2006 10:31 pm
- Location: Florida, Milton
- Contact:
re: Project "Uncle Fester"-7/10 Bed "Dolly&qu
That'll work for a little while. I did have some set up in the can even though I had the plastic/towel/lid combo clamped down. Of course, it was like 2 months between applications for me. You won't have that problem I'm sure.
Chris
72 F100 Stepside w/ 78 300 CID
Hedman Headers
Disc Brakes
Power Steering with 3 STILL on the tree
Comfy Crown Vic Seats
71 F250 PS, PB, AC, Auto, 390
Loooong way to go on this one!


72 F100 Stepside w/ 78 300 CID
Hedman Headers
Disc Brakes
Power Steering with 3 STILL on the tree
Comfy Crown Vic Seats
71 F250 PS, PB, AC, Auto, 390
Loooong way to go on this one!


- 72stepside
- Blue Oval Fan

- Posts: 537
- Joined: Tue May 09, 2006 10:31 pm
- Location: Florida, Milton
- Contact:
re: Project "Uncle Fester"-7/10 Bed "Dolly&am
Pretty good bit of body work accomplished on the bed over the last two weekends. A spot weld cutter is a must for this type of work. It saved the surrounding good metal from the abuse of a sawzall. Most all of the other dents and scrapes have been hammered out. The rot was only in the upper driver side corner of the floor and lower side panel.
The lower portion of the driver side was rotted pretty bad.
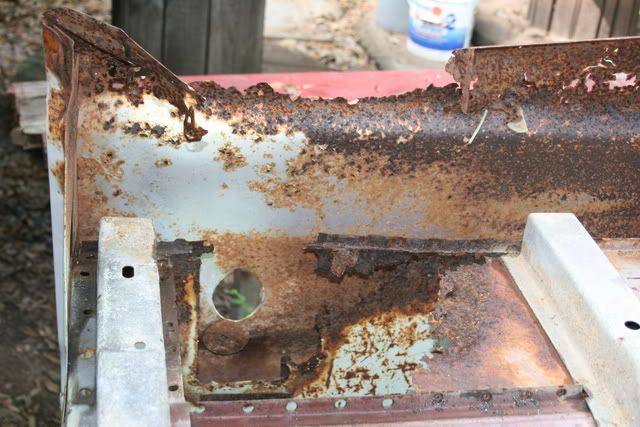
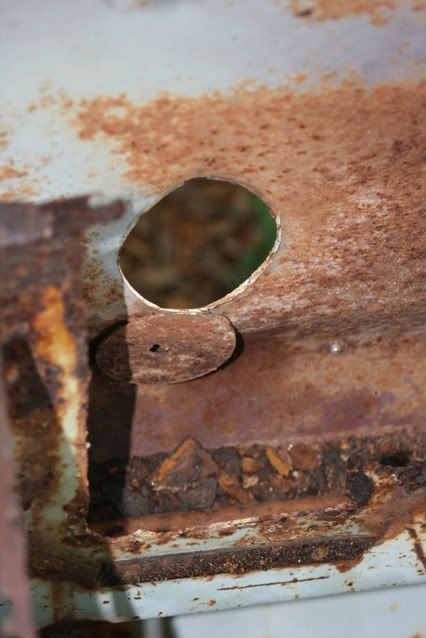
Here's a close up of the Factory mod for the filler tube. Drill a pilot hole, cut the circle partially, fold coupon over. Been hanging like that since 1971. Fell out from hammering and grinding.
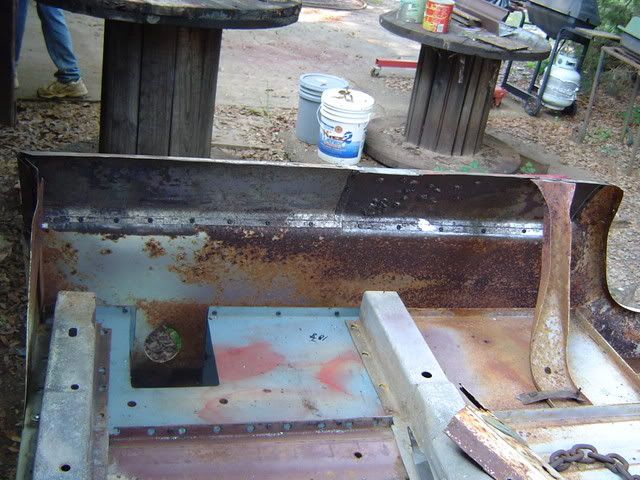
Here it is with the patch panels fabricated and screwed in place for fitment.
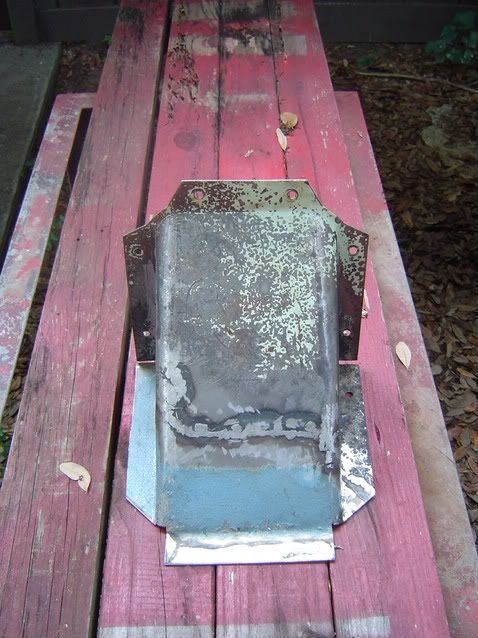
Here is the patched filler tube cover that is inside the bed. The blue is all new metal. The whole lower portion of this was pretty much gone.
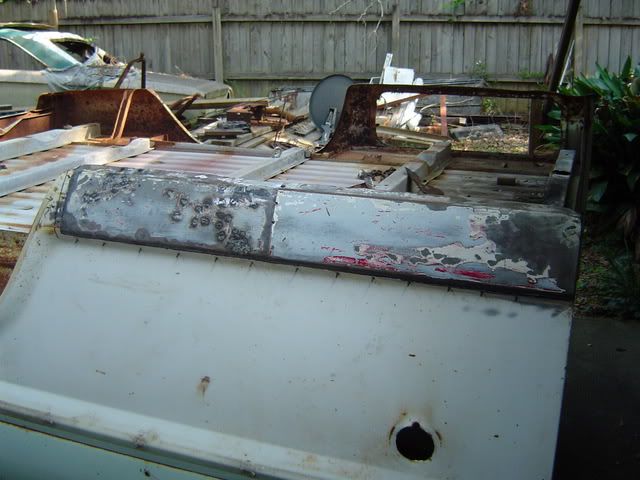
Here are the patch panels from the outside, screwed in for fitment. These are actually two lower panels from a short box I have that has NO floor and a side panel seam that has a gallon of bondo in it.
And finally, the outside panels all welded and ground.
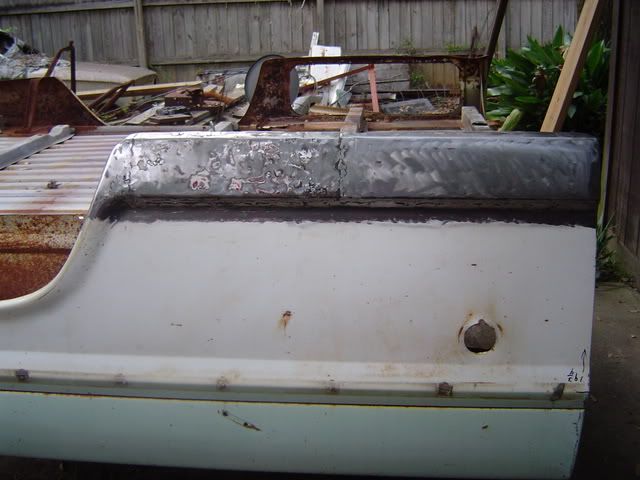
The next step is to finish up the welding in the box floor and seal it with POR-15. Then comes the cab.
The problem with the lift on the 8N was the safety valve had stuck, rendering the lift useless. It has since been replaced and lifted the bed again this past weekend.
Big thanks to Dad for all the welding and fabrication help.
The lower portion of the driver side was rotted pretty bad.

Here's a close up of the Factory mod for the filler tube. Drill a pilot hole, cut the circle partially, fold coupon over. Been hanging like that since 1971. Fell out from hammering and grinding.

Here it is with the patch panels fabricated and screwed in place for fitment.

Here is the patched filler tube cover that is inside the bed. The blue is all new metal. The whole lower portion of this was pretty much gone.

Here are the patch panels from the outside, screwed in for fitment. These are actually two lower panels from a short box I have that has NO floor and a side panel seam that has a gallon of bondo in it.

And finally, the outside panels all welded and ground.

The next step is to finish up the welding in the box floor and seal it with POR-15. Then comes the cab.
The problem with the lift on the 8N was the safety valve had stuck, rendering the lift useless. It has since been replaced and lifted the bed again this past weekend.
Big thanks to Dad for all the welding and fabrication help.
Chris
72 F100 Stepside w/ 78 300 CID
Hedman Headers
Disc Brakes
Power Steering with 3 STILL on the tree
Comfy Crown Vic Seats
71 F250 PS, PB, AC, Auto, 390
Loooong way to go on this one!


72 F100 Stepside w/ 78 300 CID
Hedman Headers
Disc Brakes
Power Steering with 3 STILL on the tree
Comfy Crown Vic Seats
71 F250 PS, PB, AC, Auto, 390
Loooong way to go on this one!


-
FordTruck
- Blue Oval Guru

- Posts: 1160
- Joined: Wed Aug 15, 2007 4:47 pm
- Location: The GREAT State Of Missouri
- Contact:
Re: re: Project "Uncle Fester"-update 12/24/07 Par
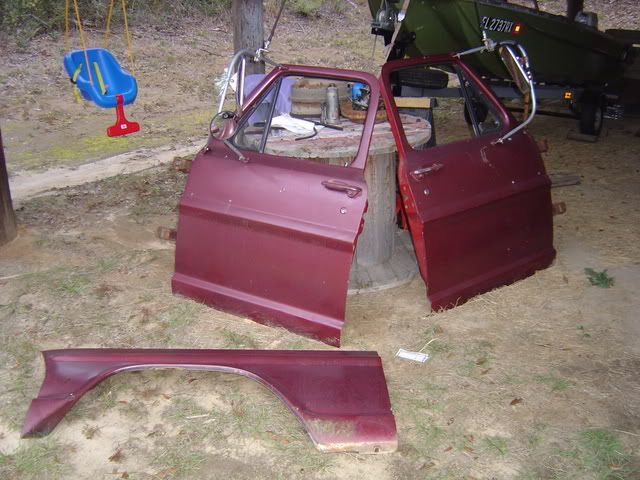
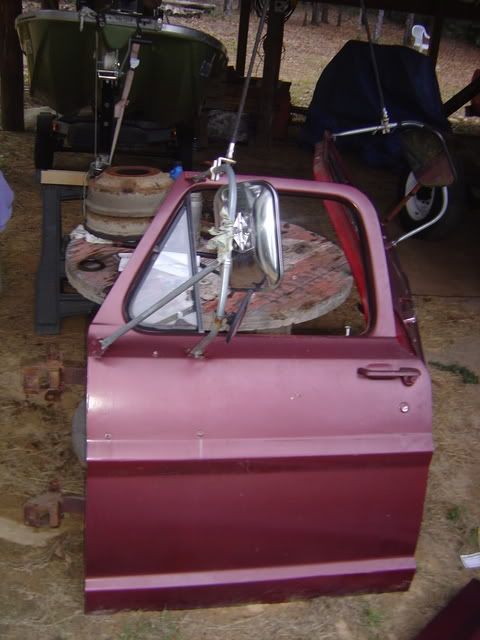
That's EXACTLY!!! how i want to do my CB antennas on my bump once i find those mirrors.72stepside wrote:Made a quick trip to the junkyard last Saturday to see if there were any new donors available. I brought a small tool kit and ended up getting two doors and a driver side fender
You can see I got some mirrors and dual CB antennas too. These came off a '71 F-350 Chassis Cab. For $129 I got the doors which have minimal rust and dents and the fender. The fender has the area just forward of the tire curled up. I can straighten it with no problem. There is ZERO rust on this fender.
"Flyin High On Caffine And Copenhagen" R.I.P Chris LeDoux
60 Mercury Comet
65 Ford Econoline
72 Ford F100 on 79 4x4 SWB frame
77 Ford F250 "lowboy" 4x4
09 Harley Xl1200c
60 Mercury Comet
65 Ford Econoline
72 Ford F100 on 79 4x4 SWB frame
77 Ford F250 "lowboy" 4x4
09 Harley Xl1200c
- rjewkes
- 100% FORDified!

- Posts: 3711
- Joined: Sun Apr 17, 2005 1:09 am
- Location: Missouri, Webb City
- Contact:
Hey check with flatybedford he has a pair of black ones he was selling me but i can get a pair later.
"It is better to keep your mouth shut and appear stupid than to open it and remove all doubt." - Mark Twain
'70 f250 4x4 Crew cab 460/C6 '72 F100 390/C6 9.8 MPG AVG. '89 Mercury Cougar LS Dual Exh. V6 . 18.9 MPG AVG. In Town.

I don't want to give em a heart-attack. That is what would happen if I answered the door in the buff. Heck it almost scares me to death when I step out of the shower and look in the mirror.~Mancar1~
fuelly.com
'70 f250 4x4 Crew cab 460/C6 '72 F100 390/C6 9.8 MPG AVG. '89 Mercury Cougar LS Dual Exh. V6 . 18.9 MPG AVG. In Town.

I don't want to give em a heart-attack. That is what would happen if I answered the door in the buff. Heck it almost scares me to death when I step out of the shower and look in the mirror.~Mancar1~
fuelly.com
- 72stepside
- Blue Oval Fan

- Posts: 537
- Joined: Tue May 09, 2006 10:31 pm
- Location: Florida, Milton
- Contact:
re: Project "Uncle Fester"-7/20 - Bed Repair
Not too much to report. Been spending the past few Saturdays welding up holes then grinding. Alot of grinding !!!! My truck had a drop in camper in it before I got it. I think they had it bolted in at least 10 different areas... bed rails and floor. All those are all patched now.
Just a few more dents to hammer out. The bottom cross members where the bed contacts the frame were completely broken in two places. I don't mean rotted, broken. The metal actually cracked and failed. These two places get repaired soon and that should be it for the metal work on the bed. Then comes filler and primer.
Won't be much going on this week. My mother is having surgery this week and I'll be going on a bike trip to the mountains next weekend.
Stay tuned...
Chris
72 F100 Stepside w/ 78 300 CID
Hedman Headers
Disc Brakes
Power Steering with 3 STILL on the tree
Comfy Crown Vic Seats
71 F250 PS, PB, AC, Auto, 390
Loooong way to go on this one!


72 F100 Stepside w/ 78 300 CID
Hedman Headers
Disc Brakes
Power Steering with 3 STILL on the tree
Comfy Crown Vic Seats
71 F250 PS, PB, AC, Auto, 390
Loooong way to go on this one!


