Getting started on the choptop truck...
Moderator: FORDification
-
Heavenlyfire

- Blue Oval Fan

- Posts: 598
- Joined: Sun May 01, 2005 8:40 pm
- Location: Arizona, Mesa
- Contact:
re: Getting started on the choptop truck...

-
71 LONG BED

- 100% FORDified!

- Posts: 1588
- Joined: Wed Jun 14, 2006 7:28 am
- Location: Hamburg, NJ
Re: re: Getting started on the choptop truck...
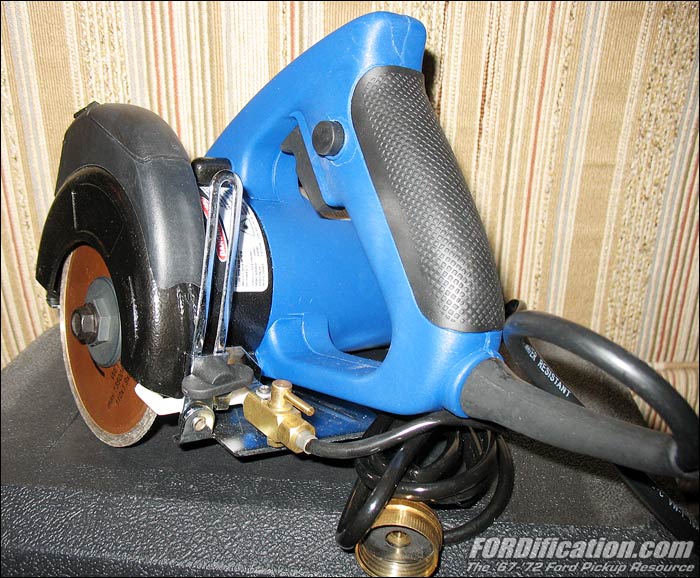
Interesting stuff. That saw sounds to easy to be true.FORDification wrote:I'll be using a water-cooled tile saw to trim down a stock windshield. (CLICK HERE for a picture.) And you can read this thread in which I was discussing it, and also includes links to threads at the HAMB messageboard where I learned about this neat little trick.71 LONG BED wrote:Your progress looks great.
What are your plans for a wind sheild? I remember seeing a dentside chop top in a mag years ago and the write up said it took quite a few trys before he successfully cut the wind sheild down to fit.
I still can't wait to see the chop top finished and ready to go down the road. Maybe you can post some video of it when it's up and running.
John Member #1549
71 F100 Sport Custom__________1967 F350 Gone, but not forgotten


71 F100 Sport Custom__________1967 F350 Gone, but not forgotten
-
FORDification

- Site & Forum Admin

- Posts: 8050
- Joined: Sun Jul 11, 2004 12:52 am
- Location: Kansas, Wellsville
- Contact:
re: Getting started on the choptop truck...
Well, today was just about a wasted day. I was kinda anxious to get the buckets set into the truck just to get an idea of what kind of work would be needed to get them mounted, and how low I could get them to set. I pretty much figured on completely removing the tracks, and just bolting the seat frame itself directly to the floor. It turns out that the inside mount on each side will be easy...no mount fabrication necessary, just bolt it to the floor. However, the outside mount on each side will require a full custom mount.
I hit the shop a little before 9AM...and spent the ENTIRE day getting the driver's-side mount fabricated. It definitely took a lot longer than I thought, due to a number of factors. I tried several different things before deciding on a course of action. Once I made the decision constructing the mount, I had to redo my own work twice, due to some warping during the welding process. Oh well...the other side should go a lot faster, now that I know what I'm doing (more or less).
Anyway...this first picture shows the factory mounting on the Probe seats. (Incidentally, what I thought was electric lumbar sumpport adjustment is actually vacuum...the small canister up under the seat is the vacuum pump.)

A while back I bought a pair of seat brackets that was advertised as for mounting a bench seat. I decided to try using these first...and if the floorpan was completely flat, these would've worked great. Here's a shot of them bolted up to the seat frame, after removing the plastic cover and grinding out the factory rivets and spotwelds holding the tracks to the frame:

Because the outer edge of each seat sticks out past the flat section of the floorpan, these wouldn't work. I toyed around with several ideas to modify them to make them work, but in the end I had to just scrap the idea about using them altogether, and come up with something different.
Since I just cleaned out my shop a few weeks ago of most of my scrap iron, I didn't have a lot to choose from for steel stock. I was walking around the 4x4 outside trying to get some ideas, when I suddenly noticed that the grille guard on the front of the truck had exactly what I needed. Since I wasn't really attached to it anyway, it donated the 1/4" steel to make these brackets. (Yeah, I know...overkill, right? But at least I'll never have to worry about them bending or breaking!)
The outside headlight loop on each side of the grille guard will be the main section for the seat mounts, so I got started cutting those off:


Here's a shot taken about halfway through the fabrication of the driver's-side mount. I'm getting things just tack-welded into place until I'm sure it's all gonna fit and work right:

I made the mistake of thinking that the tack welds would hold things in place when the mount was removed so it could be fully welded up. I ended up with some warpage between several of the pieces, and while they'd have still worked, I just wasn't happy with the results, so I ended up cutting several welds and redoing them...only to have the same thing happen again. I again removed the welds, but then had to built a clamping device to hold everything in place and keep it square, and the third time it worked great. Here's the semi-finished mount in place:

All that's left to do is actually drill the mounting holes and bolt it into place, and to drill one more hole for another bolt from the seat frame to the bracket, so there will be three bolts there, and then drill three more to bolt the bracket to the cab floor. I figure maybe an hour's worth of work to finish up this side, then I simply have to re-create this for the passenger side. Here's a shot of the bracket with the seat cover reinstalled:

I'm not going to worry about cleaning it up and painting it, because I'm going to be mounting a 1/8" steel panel (that's even louvered) over the mount as a cover...that will be painted the carpet color (either gray or black).
Anyway, since I wasted a whole day working on this, I'm a little behind in my bodywork plan. This just means I need to hit the ground running tomorrow, and get as much done as possible. I might still be able to have the truck ready to paint on Friday...but if not, then hopefully this weekend.
I hit the shop a little before 9AM...and spent the ENTIRE day getting the driver's-side mount fabricated. It definitely took a lot longer than I thought, due to a number of factors. I tried several different things before deciding on a course of action. Once I made the decision constructing the mount, I had to redo my own work twice, due to some warping during the welding process.
Anyway...this first picture shows the factory mounting on the Probe seats. (Incidentally, what I thought was electric lumbar sumpport adjustment is actually vacuum...the small canister up under the seat is the vacuum pump.)
A while back I bought a pair of seat brackets that was advertised as for mounting a bench seat. I decided to try using these first...and if the floorpan was completely flat, these would've worked great. Here's a shot of them bolted up to the seat frame, after removing the plastic cover and grinding out the factory rivets and spotwelds holding the tracks to the frame:
Because the outer edge of each seat sticks out past the flat section of the floorpan, these wouldn't work. I toyed around with several ideas to modify them to make them work, but in the end I had to just scrap the idea about using them altogether, and come up with something different.
Since I just cleaned out my shop a few weeks ago of most of my scrap iron, I didn't have a lot to choose from for steel stock. I was walking around the 4x4 outside trying to get some ideas, when I suddenly noticed that the grille guard on the front of the truck had exactly what I needed. Since I wasn't really attached to it anyway, it donated the 1/4" steel to make these brackets.
The outside headlight loop on each side of the grille guard will be the main section for the seat mounts, so I got started cutting those off:
Here's a shot taken about halfway through the fabrication of the driver's-side mount. I'm getting things just tack-welded into place until I'm sure it's all gonna fit and work right:
I made the mistake of thinking that the tack welds would hold things in place when the mount was removed so it could be fully welded up. I ended up with some warpage between several of the pieces, and while they'd have still worked, I just wasn't happy with the results, so I ended up cutting several welds and redoing them...only to have the same thing happen again. I again removed the welds, but then had to built a clamping device to hold everything in place and keep it square, and the third time it worked great. Here's the semi-finished mount in place:
All that's left to do is actually drill the mounting holes and bolt it into place, and to drill one more hole for another bolt from the seat frame to the bracket, so there will be three bolts there, and then drill three more to bolt the bracket to the cab floor. I figure maybe an hour's worth of work to finish up this side, then I simply have to re-create this for the passenger side. Here's a shot of the bracket with the seat cover reinstalled:
I'm not going to worry about cleaning it up and painting it, because I'm going to be mounting a 1/8" steel panel (that's even louvered) over the mount as a cover...that will be painted the carpet color (either gray or black).
Anyway, since I wasted a whole day working on this, I'm a little behind in my bodywork plan. This just means I need to hit the ground running tomorrow, and get as much done as possible. I might still be able to have the truck ready to paint on Friday...but if not, then hopefully this weekend.
____| \__
-O-----O- Keith
'67 F-100 2WD SWB ~ '69 F-100 4WD SWB w/7" chop ~ 1975 F-250 Ranger XLT Supercab Camper Special

My '67 restoration video
-> Posting and you! <-a MUST watch for all!!
-O-----O- Keith
'67 F-100 2WD SWB ~ '69 F-100 4WD SWB w/7" chop ~ 1975 F-250 Ranger XLT Supercab Camper Special
My '67 restoration video
-> Posting and you! <-a MUST watch for all!!
-
Heavenlyfire
- Blue Oval Fan
- Posts: 598
- Joined: Sun May 01, 2005 8:40 pm
- Location: Arizona, Mesa
- Contact:
re: Getting started on the choptop truck...
Wow Keith, great work. Those are gonna look great in there. Looks like they are gonna be pretty low too.
-
mjhaltom
- Preferred User

- Posts: 400
- Joined: Thu Aug 03, 2006 7:24 am
- Location: Georgia, Elberton
re: Getting started on the choptop truck...
Looks great. Opens up your eyes to more seat options, too
2015 lifted Toyota tundra 4.6 4wd
2002 Toyota Sequoia 2wd 4.7 auto
1989 Ford F150
1979 Chevrolet C10 350/TH400 14 bolt "Big 10" (DD)
1972 F100 parts truck long bed
1971 F100 2WD LWB 302 aod 3.70 9inch PS pb
1966 International Scout 800
1954 GMC rat rod project Scout frame, inline 6, T90 4X4
1953 Chevrolet Tin Woody
1946 Hudson BigBoy Pickup-ratrod project
-
FORDification
- Site & Forum Admin
- Posts: 8050
- Joined: Sun Jul 11, 2004 12:52 am
- Location: Kansas, Wellsville
- Contact:
re: Getting started on the choptop truck...
Well, it's almost 11PM here...I just walked in the door from a LONG day at the shop, most of it just sanding. The good news is, I should finish with the bodywork tomorrow (Friday), and depending on how much time is left, I might get it painted. I have to be home by 6PM to watch the kids, so whether or not the truck gets painted tomorrow depends on how quickly I can finish up the last-minute details on the body.
However, the painting HAS begun! As most of you know, the truck will be flat black, rattlecanned over a coat of POR-15. Since I kinda wanted to test out my painting process on a semi-hidden area of the truck first, I decided to paint the outside rear of the cab, since it will mostly hidden by the bed. I used a small foam roller to apply the coat of POR-15, then let it set up to where it was almost dry (very tacky) and then rattlecanned on several coats of Krylon Ultra-Flat. However, I was kinda disappointed in the result. When painting everything else this way (the engine bay, inner fenders, etc), you couldn't see any streaks caused from using a spray can. I always figured it was due to the POR-15 undercoat that helped absorb the Krylong. However, this time you can definitely see streaks...it's very obvious it's been rattlecanned on.

I'm not sure if the streaks this time were caused by the properties of the flat black paint or if maybe I waited too long before applying it. I'm kinda thinking it's the paint...however, when I go to actually to the exterior body panels, I'm going to try spraying the paint a little earlier and see if that makes a difference. I'm not holding my breath though. After giving it much thought today, I've decided that I really don't want streaks in the paint, so even though this IS supposed to be a low-buck approach, if the exterior panels streak the second time around, then I'm going to bite the bullet and get a gallon of either Hot Rod Flatz or John Deere Blitz Black and spray it on with a gun. I'll make that decision for sure tomorrow (hopefully) once I start doing the rest of the body panels.
Anyway, I did get the cab ceiling painted...I had a half-quart of Eastwood's Rust Encapsulator left over, so I finished it off on the roof:

I just used a brush to apply that, since I wasn't too worried about brush strokes showing there...it'll eventually get covered up. I also wanted to use a regular bristle-type brush (as opposed to a foam brush) in order to get the paint into the nooks and crannies of the back side of the roof seams.
Then I got the inner rear cab wall and the front kickpanel areas painted, and I was finally ready for the inner floorpans. However, I had to get the tunnel cover mounted first:

...and then I could finally get the floorpans painted:

I've got a few more pics to post, as well as some more details about what I'm doing, and I'll get those posted to a project update page tomorrow evening after the kids go to bed.
However, the painting HAS begun! As most of you know, the truck will be flat black, rattlecanned over a coat of POR-15. Since I kinda wanted to test out my painting process on a semi-hidden area of the truck first, I decided to paint the outside rear of the cab, since it will mostly hidden by the bed. I used a small foam roller to apply the coat of POR-15, then let it set up to where it was almost dry (very tacky) and then rattlecanned on several coats of Krylon Ultra-Flat. However, I was kinda disappointed in the result. When painting everything else this way (the engine bay, inner fenders, etc), you couldn't see any streaks caused from using a spray can. I always figured it was due to the POR-15 undercoat that helped absorb the Krylong. However, this time you can definitely see streaks...it's very obvious it's been rattlecanned on.
I'm not sure if the streaks this time were caused by the properties of the flat black paint or if maybe I waited too long before applying it. I'm kinda thinking it's the paint...however, when I go to actually to the exterior body panels, I'm going to try spraying the paint a little earlier and see if that makes a difference. I'm not holding my breath though. After giving it much thought today, I've decided that I really don't want streaks in the paint, so even though this IS supposed to be a low-buck approach, if the exterior panels streak the second time around, then I'm going to bite the bullet and get a gallon of either Hot Rod Flatz or John Deere Blitz Black and spray it on with a gun. I'll make that decision for sure tomorrow (hopefully) once I start doing the rest of the body panels.
Anyway, I did get the cab ceiling painted...I had a half-quart of Eastwood's Rust Encapsulator left over, so I finished it off on the roof:
I just used a brush to apply that, since I wasn't too worried about brush strokes showing there...it'll eventually get covered up. I also wanted to use a regular bristle-type brush (as opposed to a foam brush) in order to get the paint into the nooks and crannies of the back side of the roof seams.
Then I got the inner rear cab wall and the front kickpanel areas painted, and I was finally ready for the inner floorpans. However, I had to get the tunnel cover mounted first:
...and then I could finally get the floorpans painted:
I've got a few more pics to post, as well as some more details about what I'm doing, and I'll get those posted to a project update page tomorrow evening after the kids go to bed.
____| \__
-O-----O- Keith
'67 F-100 2WD SWB ~ '69 F-100 4WD SWB w/7" chop ~ 1975 F-250 Ranger XLT Supercab Camper Special
My '67 restoration video
-> Posting and you! <-a MUST watch for all!!
-O-----O- Keith
'67 F-100 2WD SWB ~ '69 F-100 4WD SWB w/7" chop ~ 1975 F-250 Ranger XLT Supercab Camper Special
My '67 restoration video
-> Posting and you! <-a MUST watch for all!!
-
RebelRider

- Preferred User
- Posts: 295
- Joined: Fri Feb 09, 2007 7:16 pm
- Location: Missouri, Monett
re: Getting started on the choptop truck...
Lookin good Keith!
I tend to agree with you that it's the paint.
I've run into that before where two cans of the same paint will spray and finish totally different!
I tend to agree with you that it's the paint.
I've run into that before where two cans of the same paint will spray and finish totally different!
-
FORDification
- Site & Forum Admin
- Posts: 8050
- Joined: Sun Jul 11, 2004 12:52 am
- Location: Kansas, Wellsville
- Contact:
re: Getting started on the choptop truck...
The truck is painted!
(well, more or less...if you wanna call it that)
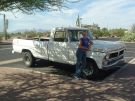
I was able to finish the bodywork by early afternoon. Here's a shot taken just prior to the painting process:

Here's a shot after applying two coats of POR-15:

Here's the finished product:

However, although it looks good in that last pic...let me tell you that I cannot begin to emphasize just how crappy it actually turned out. It turned out so bad that I couldn't even be upset, all I could do was laugh. Oh well...live and learn, I guess.
I kinda figured the flat black paint would leave streaks, after testing it out yesterday. What I didn't anticipate was the reaction it would have with the POR-15 when applied before it was almost dry. As stated last night, I'd decided to try spraying the Krylon on a little earlier in the drying process, to see if that would eliminate (or at least reduce) the streaking. However, by doing so, the solvents in the POR-15 didn't have time to evaporate before I tried to seal them up, so I ended up with all kinds of paint popping. And not only that, but it ended up wrinking the paint too...in fact, almost giving it the texture of vinyl....or even wrinkle paint. (Not quite that bad, but it's getting close.) Here's a close-up shot of the texture of the whole paint job now:

As you can see, the top roof panel actually didn't texture quite that much or have much paint popping, but that was because that's where I started with the POR-15, so by the time I got around to spraying the Krylon it was a bit drier than the other panels. The doors and front fenders didn't have as long to set up, so the solvents in POR-15 were still evaporating when I started spraying them. However, the roof does have a slightly-worse case of the paint streaking. Here's a shot taken of the driver's-side fender, which is indicative of the rest of the body panels:

You can see there's a lot of paint popping. Man, when I saw that starting to happen, all I could do was stare and groan....and then laugh, since there was nothing I could do about it. Don't get me wrong, I was upset, especially because of all the time I'd invested into the bodywork, but still...
Oh well...I guess it's not a total loss for me to make the mistakes, as long as someone learns from them.

I DID find that I was able to reduce the streaking by spraying on VERY thick over-lapping coats of Krylon, almost to the point of it running. There must be 6-8 coats on the driver's door and fender, but the streaking is still there, just not as bad as the roof and passenger side, but still too much, and not acceptable.
So...what to do now?
Well, I'm actually not too upset about the texture. Given the theme of this project, it does kinda add to the 'rough and ugly' part of it. I could actually live with the texture and like it, but the paint popping and the streaking just aren't going to cut it. Therefore, I'm going to go ahead and order a gallon of regular flat black automotive paint. I'll give the truck a very light sanding, just enough to smooth out the dried pops and then spray it with a gun, something I suppose in hindsight I should have done in the first place....especially after the failed test yesterday.
Sorry for the anti-climatic finish (no pun intended)
(well, more or less...if you wanna call it that)
I was able to finish the bodywork by early afternoon. Here's a shot taken just prior to the painting process:
Here's a shot after applying two coats of POR-15:
Here's the finished product:
However, although it looks good in that last pic...let me tell you that I cannot begin to emphasize just how crappy it actually turned out.
I kinda figured the flat black paint would leave streaks, after testing it out yesterday. What I didn't anticipate was the reaction it would have with the POR-15 when applied before it was almost dry. As stated last night, I'd decided to try spraying the Krylon on a little earlier in the drying process, to see if that would eliminate (or at least reduce) the streaking. However, by doing so, the solvents in the POR-15 didn't have time to evaporate before I tried to seal them up, so I ended up with all kinds of paint popping. And not only that, but it ended up wrinking the paint too...in fact, almost giving it the texture of vinyl....or even wrinkle paint. (Not quite that bad, but it's getting close.)
As you can see, the top roof panel actually didn't texture quite that much or have much paint popping, but that was because that's where I started with the POR-15, so by the time I got around to spraying the Krylon it was a bit drier than the other panels. The doors and front fenders didn't have as long to set up, so the solvents in POR-15 were still evaporating when I started spraying them. However, the roof does have a slightly-worse case of the paint streaking. Here's a shot taken of the driver's-side fender, which is indicative of the rest of the body panels:
You can see there's a lot of paint popping. Man, when I saw that starting to happen, all I could do was stare and groan....and then laugh, since there was nothing I could do about it. Don't get me wrong, I was upset, especially because of all the time I'd invested into the bodywork, but still...
Oh well...I guess it's not a total loss for me to make the mistakes, as long as someone learns from them.
I DID find that I was able to reduce the streaking by spraying on VERY thick over-lapping coats of Krylon, almost to the point of it running. There must be 6-8 coats on the driver's door and fender, but the streaking is still there, just not as bad as the roof and passenger side, but still too much, and not acceptable.
So...what to do now?
Well, I'm actually not too upset about the texture. Given the theme of this project, it does kinda add to the 'rough and ugly' part of it. I could actually live with the texture and like it, but the paint popping and the streaking just aren't going to cut it. Therefore, I'm going to go ahead and order a gallon of regular flat black automotive paint. I'll give the truck a very light sanding, just enough to smooth out the dried pops and then spray it with a gun, something I suppose in hindsight I should have done in the first place....especially after the failed test yesterday.
Sorry for the anti-climatic finish (no pun intended)
____| \__
-O-----O- Keith
'67 F-100 2WD SWB ~ '69 F-100 4WD SWB w/7" chop ~ 1975 F-250 Ranger XLT Supercab Camper Special
My '67 restoration video
-> Posting and you! <-a MUST watch for all!!
-O-----O- Keith
'67 F-100 2WD SWB ~ '69 F-100 4WD SWB w/7" chop ~ 1975 F-250 Ranger XLT Supercab Camper Special
My '67 restoration video
-> Posting and you! <-a MUST watch for all!!
-
jzjames

- 100% FORDified!
- Posts: 1785
- Joined: Sun Jan 09, 2005 2:59 pm
- Location: Washington, Windy Point
re: Getting started on the choptop truck...
Well Kieth, youve got a good base of paint on there. It looks pretty good. If you want to get the smoother look, wait a few months for all that stuff to cure and then do your smoothing with like 220 wet/dry and re shoot til your heart content. Looks good.
"Do it with the resources you got".
"Do it with the resources you got".
-
wolfpack
- New Member

- Posts: 146
- Joined: Sun Feb 06, 2005 8:25 pm
- Location: Kansas
re: Getting started on the choptop truck...
I think it looks good your making good time... are you ahead or behind schedule? i wish i could get things done that fast....
The dumbest question in the world is the one you don't ask.
-
Mooosman
- New Member
- Posts: 145
- Joined: Thu Jul 20, 2006 10:17 pm
- Location: Las Vegas, NV
re: Getting started on the choptop truck...
It'll look bitchin when rolling down the road, and that's what matters!
In parking lots, it'll be a 10 footer. Perfectly acceptable (to me) for a daily driver or a project car.
Have fun with it, that's what you're building it for! And now you don't have to worry so much about really nice paint!
Nick,
Summer's here...Go cruise!
In parking lots, it'll be a 10 footer. Perfectly acceptable (to me) for a daily driver or a project car.
Have fun with it, that's what you're building it for! And now you don't have to worry so much about really nice paint!
Nick,
Summer's here...Go cruise!
1972 F-100 Custom SWB
-
SmokeyBear

- Preferred User
- Posts: 367
- Joined: Tue Sep 27, 2005 8:41 am
- Location: Kentucky
-
FORDification
- Site & Forum Admin
- Posts: 8050
- Joined: Sun Jul 11, 2004 12:52 am
- Location: Kansas, Wellsville
- Contact:
Re: re: Getting started on the choptop truck...
Yeah, that's probably what I'll do before the end of the summer, once I get the rest of the body reassembled. I'm not going to spend very much time or effort trying to smooth the texture, but if I can at least knock down the blisters and then have it sprayed so that it'll at least be streak-free, I'll be happy with it.jzjames wrote:Well Kieth, youve got a good base of paint on there. It looks pretty good. If you want to get the smoother look, wait a few months for all that stuff to cure and then do your smoothing with like 220 wet/dry and re shoot til your heart content. Looks good...
Yeah, I'm not doing too badly in that department...things are starting to come together over the past week, but that was only 'cause I took the whole week off work. Now that's over, so things will slow back down...but it'll still be fairly steady progress. I originally intended to have this done by springtime, and that officially ends next month, so I guess I'd have to say I'm actually a little behind schedule. Oh well...wolfpack wrote:I think it looks good your making good time... are you ahead or behind schedule? i wish i could get things done that fast
Considering the theme of this truck, I'm not entirely disappointed in the quality of the paint job, I knew it wasn't going to be professional-looking, so I'm not going to lose any sleep over it. I'll just continue with the reassembly, and if time/funds allow after everything's reassembled, I'll go ahead and lay down a layer or two with the paint gun, just to smooth it out a little bit and at least make all the panels match.
____| \__
-O-----O- Keith
'67 F-100 2WD SWB ~ '69 F-100 4WD SWB w/7" chop ~ 1975 F-250 Ranger XLT Supercab Camper Special
My '67 restoration video
-> Posting and you! <-a MUST watch for all!!
-O-----O- Keith
'67 F-100 2WD SWB ~ '69 F-100 4WD SWB w/7" chop ~ 1975 F-250 Ranger XLT Supercab Camper Special
My '67 restoration video
-> Posting and you! <-a MUST watch for all!!
-
FORDification
- Site & Forum Admin
- Posts: 8050
- Joined: Sun Jul 11, 2004 12:52 am
- Location: Kansas, Wellsville
- Contact:
re: Getting started on the choptop truck...
I called the local implement dealer and inquired about the John Deere Blitz Black this afternoon. They didn't have any in stock, but said they could order it, and it would be in in 3 days. $29/gallon....so I ordered two gallons. (I'd rather have it and not need it than need it and not have it.) It should be here Friday, they said. And rather than trying to spray this with my old Binks Model 7 gun, I'm going to invest in an inexpensive HVLP gun through Harbor Freight.
I did stop by the shop today to drop something off after work, and was looking the paint job over again. The texture pictured above actually settled down a little bit, so I'm kinda thinking that a light wet-sanding will be all that'll be needed to get it smooth(ish) again.
I did stop by the shop today to drop something off after work, and was looking the paint job over again. The texture pictured above actually settled down a little bit, so I'm kinda thinking that a light wet-sanding will be all that'll be needed to get it smooth(ish) again.
____| \__
-O-----O- Keith
'67 F-100 2WD SWB ~ '69 F-100 4WD SWB w/7" chop ~ 1975 F-250 Ranger XLT Supercab Camper Special
My '67 restoration video
-> Posting and you! <-a MUST watch for all!!
-O-----O- Keith
'67 F-100 2WD SWB ~ '69 F-100 4WD SWB w/7" chop ~ 1975 F-250 Ranger XLT Supercab Camper Special
My '67 restoration video
-> Posting and you! <-a MUST watch for all!!